The Filament framework provides a modern UI and a very extensive variety of features and components. It enables perfect, smooth integration into any Laravel project. Developers can benefit from the outstanding developer experience that they’ve come to expect from the Laravel universe. But can the framework fulfil all the requirements of your admin panel and also guarantee sustainable, scalable integration? We’ll address these questions and more in this article.
A home match for Laravel developers
Laravel [1] has been established as one of the most popular PHP frameworks in recent years thanks to its extensive features, good developer experience and great community support. Filament [2] builds on Laravel’s foundation and offers an extensive selection of user-friendly components for creating a powerful administration panel. The familiar convenience that developers appreciate so much about Laravel isn’t neglected. This is because the technical basis of the framework is the TALL stack [3], which is made up of four web technologies:
- Tailwind CSS: the modern, utility-based CSS framework [4]
- Alpine.js: the lightweight JavaScript library [5]
- Laravel : the popular PHP framework with a wide range of functions and tools
- Livewire: a Laravel library that simplifies development of interactive, dynamic web applications with server-side rendering [6]
This stack is already used in many popular applications and websites in the Laravel ecosystem. It’s a very good basis and Laravel enthusiasts will feel right at home. You can get started on development without any major hurdles.
IPC NEWSLETTER
All news about PHP and web development
Even without any prior knowledge, Filament makes it very easy to get started with the framework. The modern, colourful website at www.filamentphp.com presents an extensive live demo of the framework’s many components and possibilities (Fig. 1). A glance at the detailed documentation makes us want to get started with development ourselves.
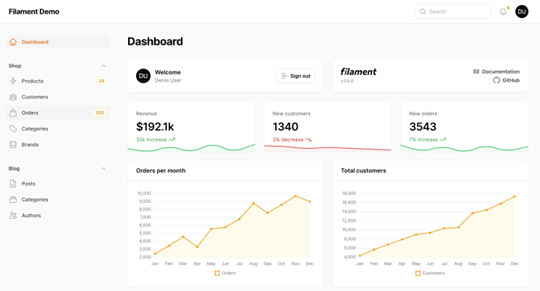
Fig. 1: Live demo on https://demo.filamentphp.com/
A finished admin panel in under a minute?!
Once the framework is installed and the first components are created, the tagline “Accelerated Laravel Development” from the website becomes clear (Fig. 2).
Once a Laravel project is set up and started, it takes less than a minute to integrate Filament into the project and for the first user to log in.

Fig. 2: Accelerated Laravel Development with Filament
So let’s get started! As usual, we install the package with Composer:
composer require filament/filament:"^3.2" -W
So far, so good! Anyone with Laravel experience knows that the framework offers a variety of Artisan commands to automatically create components and execute other processes over the command line. After intalling Filament, this command set is extended to install components specifically for Filament (Listing 1).
filament:install                      Install Filament.
make:filament-page                    Create a new Filament page class and view
make:filament-panel                   Create a new Filament panel
make:filament-relation-manager        Create a new Filament relation manager
make:filament-resource                Create a new Filament resource class
make:filament-user                    Create a new Filament user
...
Let’s use one of these commands directly to install filament together with our first panel:
php artisan filament:install --panels
After a few seconds, installation is complete. In order to log in to our panel, we need a user. Filament uses our Laravel project’s user model by default. But if we don’t have any entries in our users-table, we can easily create one with the following command:
php artisan make:filament-user
Et voilà! In less than a minute, we’ve created a complete administration panel with authentication, an initial test user, a dashboard page, a few widgets, and even an integrated dark mode. Once we’ve logged in using the automatically generated log-in form, we see a minimalist, well-designed dashboard that we want to fill with content. But how can that be? We haven’t written a single line of code or edited any configuration files, defined routes, created views or customised environment variables. Nevertheless, everything works out-of-the-box. If we look at our project structure, apart from a few JavaScript components, we only see a single PHP file that has been added to our project: app/Providers/Filament/UserPanelProvider.php. Let’s take a closer look.

The PanelProvider – The heart of Filament
The PanelProvider is the core of every Filament dashboard. It tells Laravel that this panel is now active in our project. During installation, we were asked to name our first panel, which we called user (Listing 2).
public function panel(Panel $panel): Panel {
  return $panel
    ->default()
    ->id('user')
    ->path('user')
    ->login()
    ->colors(['primary' => Color::Amber])
    ->widgets([Widgets\AccountWidget::class])
    ->pages([Pages\Dashboard::class])
    ->authMiddleware([Authenticate::class])
    // ...
}
A quick look at the clear and easy-to-read class quickly reveals why everything worked so smoothly. All important settings needed for our panel’s functionality are defined here using meaningful methods. These include the path where our panel can be accessed (/user) and the middleware used to authenticate our users. Here, Filament simply used the existing Laravel authentication, which is exactly what we wanted. Of course, default settings can be customised and extended according to our project requirements.
The default() method defines that this panel is our default panel. Since Filament version 3, you can run several panels in parallel in one project. A corresponding PanelProvider with its own authentication, pages and components is created for each user type, e.g. an AdminPanelProvider for administrators and a UserPanel for users, administrators and a UserPanelProvider for end customers. But for today, one panel is enough. So let’s start filling it with life.
One resource to rule them all
There’s currently only one user in the database. We created it earlier with the command line. Now we’d like to create more users who can use the dashboard. We’ll need the corresponding pages, tables, forms, and routes to implement the CRUD operations (Create, Read, Update, Delete) for our user model. Our first filament resource forms the basis.
A resource corresponds to an eloquent model in our Laravel project. So, we create a corresponding UserResource for the user- model. Of course, Filament also provides a simple Artisan command:
php artisan make:filament-resource User --view
And with that, we’re (almost) finished. Besides the UserResource.php file, Filament’s magic created a few more components:
- a CreateUser – page with a form for creating new users
- an EditUser – page with a form for editing users
- a ViewUser- page for viewing a user
- a ListUsers– page for displaying all users
- all necessary routes and URLs
- a link in the navigation to the ListUsers page.
In other words, it’s everything we need, and all with a single command line call. Let’s take a moment to appreciate how many days or weeks of programming we’ve just been relieved of. The only thing we need to do now is define which of the form’s fields and columns in the table should be displayed. A simple user resource might look like Listing 3.
class UserResource extends Resource {

  protected static ?string $model = User::class;

  public static function form(Form $form): Form {
    return $form->schema([
      TextInput::make('name'),
      TextInput::make('email'),
    ]);
  }

  public static function table(Table $table): Table {
    return $table
    ->columns([
      TextColumn::make('name'),
      TextColumn::make('email'),
      TextColumn::make('created_at'),
    ]);
  }

  public static function getPages(): array {
    return [
      'index' => Pages\ListUsers::route('/'),
      'create' => Pages\CreateUser::route('/create'),
      'edit' => Pages\EditUser::route('/{record}/edit'),
      'view' => Pages\ViewUser::route('/{record}/view'),
    ];
  }
}
This means that CRUD implementation of our UserModel is already complete and we can move on to the next model. But we want to embellish it a little more and optimise our dashboard’s user experience. With the UserResource as the basis, we can configure the forms and tables as we wish. We have many components at our disposal for this, which the Filament documentation covers in detail [7], including detailed tutorials and application examples.
IPC NEWSLETTER
All news about PHP and web development
Creating tables
The table object in our UserResource gives us control over our table’s appearance and functionalities.The most important components for displaying individual table fields are the columns. Depending on the table field the corresponding column type, e.g. TextColumn, IconColumn or ImageColumn. The corresponding properties for the table field are defined using configuration methods (Listing 4).
public static function table(Table $table): Table {
  $table->columns([
    TextColumn::make('name')->searchable()->sortable(),
    TextColumn::make('email')->searchable()->badge()->color('secondary'),
    IconColumn::make('active')->boolean(),
    TextColumn::make('created_at')->dateTime('d.m.Y H:i')->sortable(),
  ])
  ->paginated([25, 50, 'all'])
  ->filters([TernaryFilter::make('active')]);
}
For example, the dateTime value created_at can be converted to a European format, the email field can be displayed as a badge or the active flag can be displayed in the form of a green tick or red X using IconColumn. It’s especially noteworthy that with the searchable() method on the name and email fields, we can perform a full-text search on the user model without having to write complex queries. What takes many hours of work in other systems, Filament can solve in just 14 characters of source code.
We can further restrict the search with filters defined with the filters() method. It’s just as easy to make individual columns sortable with the sortable() method or implement pagination for the entire table with paginated() (Fig. 3).
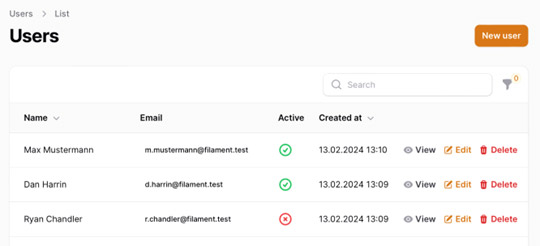
Fig. 3: UserResource table
There are practically no limits. Even if existing columns aren’t sufficient, you can create custom columns where you can define logic, including your own view. The full range of functions and the table components’ performance cannot be covered in full here. I refer you to the excellent documentation at https://filamentphp.com/docs.
Creating forms
The most important part of CRUD operations are forms to create and edit data. These can also be easily mapped in the Filament resource using the form() methodand the form object(Listing 5).
public static function form(Form $form): Form {
  return $form->schema([
    TextInput::make('name')->label(__('user.label.name'))
      ->required()->string()
      ->minLength(3)->maxLength(64),
    TextInput::make('email')->label(__('user.label.email'))
      ->required()->email()
      ->maxLength(64),
    Toggle::make('active')->label(__('user.label.active'))
      ->default(true),
  ]);
The schema is adopted by default for the Create and Edit forms, although this can be overwritten individually on the CreateUser and EditUser pages. After all, the same fields are not always required in both forms (Fig. 4).
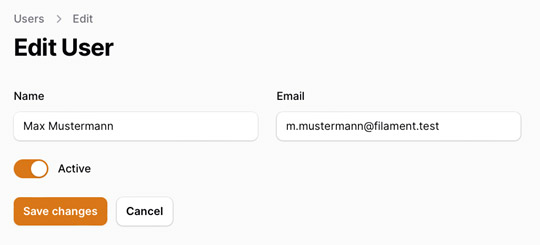
Fig. 4: Edit Form of UserResource
Depending on the type of the respective form field, you can now choose from a variety of input fields such as text input, drop-down, radio button, date-time picker, tags, rich text editor, and many more. Filament lacks nothing here and surprises with a clever and elegant implementation for every component.
Implementation allows you to configure each field according to your wishes. These configuration options are also explained in detail in the documentation.
The components provide a variety of helper methods for validating the forms. Laravel fans will be delighted, as these are modelled on Laravel’s existing validation rules. So, in addition to simple rules like required and string, more complicated ones like required_without_al l, are also available in the form of the requiredWithoutAll() method.
The Grid, Fieldset, and Tab classes are available to customise the form’s layout, allowing you to arrange the input fields in different ways. The Wizard class can be used to create a complete wizard with several steps without making the code more complex or confusing.
One particularly powerful tool is the FileUpload class, which lets us upload several files at once without much effort. When dealing with image files, we can use the imageEditor() method to activate a complete image processing tool.
There’s an image processing tool we can use to apply filters, crop, or scale each image directly after uploading (Listing 6). File and image image processing has never been so easy!
FileUpload::make('images')
  ->label('Bilder hochladen')
  ->acceptedFileTypes(['image/jpg', 'image/jpeg'])
  ->preserveFilenames()
  ->disk('s3')
  ->multiple()
  ->image()
  ->imageEditor()
  ->imageResizeMode('cover')
  ->imageCropAspectRatio('1280:720')
It is definitely worth taking a look at the documentation here. You’ll be surprised at what Filament’s developers thought of. And if you can’t find something, there’s a good chance that other users have already written a plug-in that can be found on the Filament website and (mostly) downloaded for free.
php artisan make:filament-page Settings
With this command, we create an empty settings page that’s automatically integrated into our navigation and gives our creativity free rein. As Laravel/Livewire developers, our work is made even easier. If you rummage through the source code and take a closer look at the BasePage class, where our new settings page inherits, you’ll notice that behind the variety of functionalities and the framework’s magic, there is simply a normal Livewire component:
Creating customised pages
By creating the UserResource, we’ve already learned about different types of pages. By default, Filament provides pages such as ListRecords, CreateRecord, EditRecord, and ViewRecord to process our data. Although these are enough for implementing the CRUD functionalities, as creative developers we quickly reach the point where we want to integrate something of our own into our new dashboard. Filament lets us to create customised pages for this:
abstract class BasePage extends Livewire\Component { /* ... */ }
This is extremely good news, since we benefit from the advantages of both worlds. We have access to the many Filament tools like forms, tables, widgets, and actions. We also utilise the full power and flexibility of Livewire and can define our blade.php view and work in the usual Livewire manner with the render() and mount() methods to implement our own logic (Listing 7).
class Settings extends Page {

  protected static string $view = 'filament.pages.settings';

  public function mount(): void {
    //
  }

  public function render(): View {
    //
  }
}
Although Filament already covers the majority of our requirements with its components, implementing custom pages through CustomPages offers maximum freedom and flexibility in designing our dashboard.
The ability to work as usual and not have to get used to a completely new architecture makes it very easy to get started with the framework and speeds up development immensely.

Creating actions
In the world of Filament, actions describe the ability to interact with the panel using a button or link, whether to perform operations on a page, edit a record, or simply call up a URL. Some of these actions were already added automatically when we created our resource (Listing 8).
public static function table(Table $table): Table {
  return $table
  // ...
  ->headerActions([
    CreateAction::make()
  ])
  ->actions([
    EditAction::make(),
    DeleteAction::make()
  ]);
}
In addition to these ready-made actions, we also have the option of defining our own actions. For this, the action class also offers a variety of auxiliary methods where we can precisely define their appearance and functionality.
Let’s assume we want to create a green button for each user record in our table with which we can activate this user. But before the operation is executed, a modal should appear for confirmation. The button should only be displayed if the user is not yet activated.
If we wanted to develop this feature from scratch, it could become fairly complex, especially due to a delayed execution of the operation after confirmation from the modal. Even experienced full-stack developers would probably need a few hours to work out a sustainable architecture for this process and implement it. In Filament, the implementation looks like Listing 9. An elegant, minimalist, easy-to-read implementation of a fairly complex logic. This is what makes software development fun.
Action::make('activateUser')
  ->button()
  ->color('success')
  ->icon('heroicon-o-check-circle')
  ->label(__('user.activate'))
  ->requiresConfirmation()
  ->modalDescription(__('user.activate.description'))
  ->hidden(function (User $record): bool {
    return (bool) $record->active;
  })
  ->action(function (User $record): bool {
    return $record->update(['active' => true]);
  }),
The RelationManager – Visualisation of Laravel relationships
Laravel offers an elegant way to work with linked tables with the Eloquent Relationships. If a user has several posts, this is implemented with a HasMany relationship in the form of a posts() method in the user model. You don’t need to define complicated SQL queries or joins. Here too, Filament utilises this simple implementation to implement the representation of linked records of a resource elegantly in the form of the RelationManager.
The RelationManagers are implemented in a resource and displayed as a table on the record’s view and edit page. An Artisan command also exists for creating a RelationManager:
php artisan make:filament-relation-manager UserResource posts title
This creates the PostsRelationManager.php file. As we;ve passed our UserResource, the relation posts that we’ll use and the attribute title the table will display as parameters to the command, the RelationManager knows directly where it gets its data from and how to display it. This way, we can create any number of RelationManagers for all existing HasMany or ManyToMany model relations. For the documents relation of our user model, this would be a DocumentsRelationManager.php. Now we just have to tell our UserResource that it should also use these relations (Listing 10).
public static function getRelations(): array {
  return [
    PostsRelationManager::class,
    DocumentsRelationManager::class
  ];
}
Even if this is getting a bit boring, there’s nothing more for us to do. For each of these RelationManagers, a tab is rendered in the view. Behind that, there’s a table of the corresponding linked records, together with automatically generated action buttons for creating, editing, and deleting the entries (Fig. 5). So we don’t have to write a single line of code to process the user’s posts. Filament’s magic does this automatically based on underlying Laravel conventions.
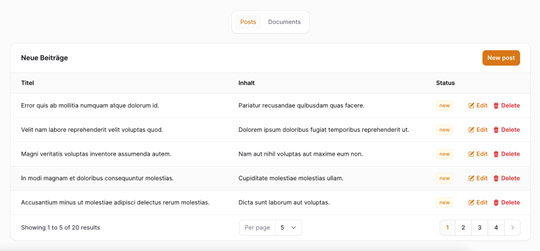
Fig. 5: Displaying linked records with a RelationManager
The structure of a RelationManager class is very similar to a resource. Here we also have the same options for configuring the class to add additional columns to the table, add new functions or buttons, adjust the title in the tab with heading(), or adjust the Eloquent Query of the underlying relation with modifyQueryUsing() to filter the list of data records in advance (Listing 11).
class PostsRelationManager extends RelationManager
{
  protected static string $relationship = 'posts';

  public function table(Table $table): Table {
    return $table
    ->heading(__('post.title.new-posts'))
    ->modifyQueryUsing(function (Builder $query) {
      return $query->where('status', 'new');
    })
    ->columns([
      TextColumn::make('title')->label(__('post.label.title')),
      TextColumn::make('content')->label(__('post.label.content')),
      TextColumn::make('status')->badge(),
    ])
    ->headerActions([
      CreateAction::make(),
    ])
    ->actions([
      EditAction::make(),
      DeleteAction::make(),
    ]);
  }
}
Testing Filament components
To ensure that our admin panel continues to function smoothly in the future, it’s advisable to write feature tests for the individual components. But Laravel or Livewire developers are also picked up directly here. Since most Filament components are based on Livewire, they can be tested just as elegantly and easily. For this, the existing practical testing helpers from Livewire have been extended to test the various functionalities of Filament’s forms, tables, and actions. This way, we can check whether our activateUser-action has the desired effect or if the sorting in our user table works. Incidentally, the test environment is based on PestPHP [8], a very good testing framework from the Laravel universe (Listing 12). But it is not a prerequisite for writing tests for Filament – PHPUnit can also be used as usual.
it('can activate users', function () {
  $user = User::factory()->create(['active' => false]);
  Livewire::test(ListUsers::class)
    ->callTableAction('activateUser', $user);
  expect($user->refresh()->active)->toBeTrue();
});

it('can sort users by name', function () {
  $users = User::factory()->count(10)->create();
  Livewire::test(ListUsers::class)
  ->assertTableColumnExists('name')
  ->sortTable('name', 'desc')
  ->assertCanSeeTableRecords($users->sortByDesc('name'), inOrder: true);
});
Great power comes with great responsibility
By now, it should be clear. Filament takes a lot of work off our hands thanks to its powerful components and outstanding developer experience. We only have to write a small amount of PHP code, define SQL queries, build complex architectures, or create blade views manually. This undoubtedly speeds up development, but it doesn’t only have advantages. Ultimately, we transfer considerable responsibility to the framework. We configure our project and rely on Filament to do the rest based on its conventions. Of course, this can lead to problems.
IPC NEWSLETTER
All news about PHP and web development
Here’s a specific example. Suppose we want to add a column to our UserResource table. But instead of using a conventional database field like before, we use an eloquent attribute from our user model. These attributes are generated dynamically and can contain complex logic depending on the use case, for example, by accessing a HasMany relation. But we’d also like to create a select drop-down menu for each entry in the table, whose options are also generated dynamically from values in the database. If the table’s pagination is set to SHOW ALL when the page is called up, this could lead to triggering over 1,000 database queries (this example is based on real events). Although we hardly wrote any code, we managed to implement processes that place an unnecessarily high load on our production system under the wrong circumstances.
The simple application of the framework often obscures how much complexity is actually behind some components. It’s advisable to use tools like Laravel Debugbar [9] or Laravel Telescope [10] to server requests, database queries, and the platform’s general performance during development. This way, we can check our code’s complexity before we deploy the new feature to the production environment.
Flexibility through complexity
In our experience with Filament, it’s clear that we can already cover the majority of use cases by consistently adhering to the framework conventions. However, for exceptional situations where standard tools aren’t enough, Filament gives us the option to overwrite the existing logic and implement our own. For example, we can customise the query for saving a data set or to set special values only under certain conditions. This is possible because the component’s helper methods can accept a closure as a parameter. We’ve already used this logic when creating our activateUser action (Listing 9). So instead of using a string or Boolean as a parameter, we can define a complex logic, wrap it in a closure, and then pass it to the method. For instance, if we only want to make an EditAction visible to administrators, we can implement this as seen in Listing 13.
// Definition of method in Filament code
public function visible(bool | Closure $condition = true): static {
  $this->isVisible = $condition;
  return $this;
}

EditAction::make()
->visible(function () {
  return auth()->user()->is_admin;
});
As powerful as this approach is, it opens the door to errors, poor readability, and unclean code. Depending on the passed closure’s complexity, elegant implementation can quickly become unreadable spaghetti code. It’s all the more important to outsource more complex processes to keep the code base clear and clean.
Accelerated Laravel Development
The slogan Filament advertises on its website lives up to its promise. I’ve already developed several projects with the framework over the past few years and am always impressed by how much work is taken off my hands thanks to the wide range of components and the uncomplicated application. After implementing a ticket, I was often amazed when I only needed half the estimated time to realise a complex feature.
The excellent documentation, simple learning curve, and rapid success in implementing new features make working with the framework really fun. Even new developers quickly get a feel for the software and can get started straight away without extensive familiarisation. Not even much experience in front-end topics such as HTML, CSS, or JavaScript is required. Solid PHP and Laravel knowledge is completely sufficient and already lets you enable the realisation of a large part of your requirements for an admin panel. And for everything else, a quick look at the Livewire or Tailwind documentation is often enough.
When implementing more complex processes that aren’t described in the documentation, things can sometimes get a little bumpy. This is because it’s not always immediately clear which method you need to use to overwrite the default logic or which parameters the closure requires for the component to function properly. At this point, you’ll often find yourself rummaging through individual classes in the vendor/filament folder to familiarise yourself with the implementation and the magic behind the framework. Practice makes perfect. An overview of the advantages and disadvantages of Filament is summarised in Table 1.
| Advantages | Disadvantages |
|---|---|
| Very good documentation | Freedom and flexibility invite you to write unclean code |
| Simple learning curve and quick success | intransparent “Magic” can influence performance |
| Good addition to the Laravel-ecosystem | |
| Very good developer experience | |
| Wide variety of components | |
| Hardly any front-end skills necessary | |
| Many plugins and extension | |
| Lots of articles and tutorials | |
| Large community |
Table 1: Advantages and disadvantages of Filament
Conclusion
In my many years as a web developer, I’ve worked with several admin panels. Although all of them somehow fulfilled their purpose, I don’t remember any of them as a perfect solution. The limits of these panels often quickly became apparent when the complex requirements could only be implemented by leveraging the predefined logic or by hacking configuration files.
And even Laravel Nova [11], the official administration panel from Laravel, couldn’t fully convince me for several reasons.
It was only with Filament that I felt I found a panel that was suitable for a quick start and would also accompany the development of the entire platform in the long term. The framework provides a solid foundation that is not only ready for immediate use, but also flexible enough to meet growing requirements and challenges for the future.
To summarise, I clearly recommend Filament. Especially for Laravel developers, the framework is the perfect complement to Laravel’s elegant implementation and simple workflows. But even for PHP purists, a look at Filament is definitely worthwhile. It’s a prime example of how simple and efficient modern web development can be.
Links & Literature
[6] https://livewire.laravel.com
[7] https://filamentphp.com/docs
[9] https://github.com/barryvdh/laravel-debugbar