
The most important rule when working on your application is: create code conventions and follow them to build a consistent application structure. This does not only apply to React applications but to all kinds of software. In React it’s much more important to stick to your coding guidelines since the library only gives you very rough guidelines. It’s a good idea to think about the basic structure of the application even before starting a new project. You have to ask yourself a couple of questions like: What type of components do I want to use? How to name the components and their files? What kind of folder structure do I need? And so on.
Components, the basic building blocks of a React application
React claims to be a library for building user interfaces. Therefore the components are the most important element in React since they are used to create the user interface. There are two different ways to create components. You can either use a JavaScript class that extends the Component class. The other way is to implement your components as functions. In the first place this was thought as a lightweight alternative to class components for stateless visual components. A further restriction was the absence of lifecycle hooks for these function components. With the introduction of the hook API in version 16.8 there is nearly no reason to use class components anymore. With function components the creation of components is much easier, you don’t have to care about “this” and the binding of methods in your component anymore. With the hook API it’s possible to have state, lifecycle hooks and easy access to the context API in your function components. This change leads to much more, smaller and reusable components in a React application. If you need a new element in your application, just create a new function, that returns the desired JSX structure and your new component is ready. You can integrate it into your applications component tree. Your function component gets its input via Props which are passed via the first paramter of the component function. The data flow to the parent component is achieved by passing functions to the child component which then can be called from the child component.
You should use function components for new applications and new features, but class components are not yet deprecated, and they should be available some years in the future. However, it should be clear for every developer when to use which type of component.
As soon as you have decided for a certain type of component you need to make more decisions. One that influences the way you work with your components is, how you export the components. You can either use named or default exports. You can use both ways, but you have to do it consistently over your application. Default exports reflect the “one component, one file” rule better. Named exports reduce the flexibility in naming the component when importing. In the end it’s up to you which way you use.
More on hooks
The introduction of the hook API turned the React world upside down. Speaking of versioning it was just a minor change, but it had an influence on the way you write a React application and it changed the whole React ecosystem. Nearly every major extension is switching from class components with higher order components and render props to the hook API and so you should do also. Popular examples for libraries going for the hook API are Redux or React Router.
Besides the fact that you don’t have to deal with “this” in your components anymore the use of hooks in your components has several other benefits over the traditional class components.
If you are working on more complex stateful components you quickly end up with a big nested state object because a class component allows only one state property. This changes with the state hook. It allows you multiple much smaller states that are independent from each other. And you don’t have to stick to the name state anymore – you can name the state variable just as you want. One thing that didn’t change is the way you work with state. Within your component it’s possible to read from the state directly but you cannot write the state by assigning a new value to the variable. If you do this, you are bypassing the change detection of React and your changes won’t take effect. The useState function returns a tuple consisting of the state variable itself and a setter function that is used to change the state and trigger a rerender of the component.
The situation is similar when it comes to the component lifecycle methods. In a class component you could only have one method implementation for each part of the component lifecycle. With the hook API you can have multiple lifecycle hooks. Each one specializing on its own aspect. This leads to shorter and much more simpler functions.
The hook API also allows you to put hook calls into so-called custom hooks. This strategy allows you to outsource logic from your component into a separate function and usually a separate file. If you make this custom hook more generic it becomes reusable in your application. This means that you can put a certain piece of logic into a custom hook and share it between your components and even between applications.
Typesafety in React
When it comes to types in JavaScript there isn’t much you can do. One of the most obvious situations in React where you want to have typing support are the Props of a component in order to define what kind of information goes into your component and how the signature of a callback function should look like that gets passed into your component. There are several approaches to solve this problem. The easiest and most lightweight is the use of PropTypes. This is a library that helps you to define the types of the Props of your component. A much better solution is the usage of TypeScript throughout your whole application. If you bootstrap your application with Create React App you have the option –typescript, which initializes your application with TypeScript support and sets up the build process so that you can easily use it. Most of the structures in React are defined as generic types, such as React.FC, the function component type as you can see in listing 1.
interface Props {
  name: string;
}

const Greet: React.FC<Props> = ({ name }) => {
  return <div>{name}</div>;
};
For your component you define an interface with the structure of the props and hand it over to React.FC. Additional advantages of using TypeScript in your project are an improved IDE support and quick feedback in case of an error by the TypeScript compiler.
The use of TypeScript also enforces you to think of your data structures and plan the implementation.
Separation of view and logic
In the frontend development there was a strict separation of technologies and languages for a long time. In the most cases this separation is still valid. Just take another framework such as Angular. You have your component file, a style sheet and a template file. React introduced JSX and suddenly you were able to place the template of a component directly into the JavaScript code of the component mixing up HTML and JavaScript. This all happened for a good reason because React doesn’t work on the real DOM for performance reasons but on an abstraction. This abstraction layer, the virtual DOM, is created by the renderer out of elements which are described by JSX. The more you mix JavaScript and JSX the harder your components become to test. Therefore you should take all of the logic that is implemented in a certain component and take it out. With this step the component becomes a simple visual component that displays information that it gets via props. It is able to call functions also passed in via props in case of an user interaction to communicate with its parent component. This kind of component can be tested easily by passing the corresponding props and checking the rendered output and triggering certain user interactions within the test and checking whether the corresponding callback has been called.
The logic can be encapsulated into another component, a container component, that only hands over a set of props to the visual component. The purpose of the container is to handle all the logic. You can put this logic into a set of pure function that can also be tested very easy and that are independent from React, so they even can be used in other applications not based on React.
Files and folders in your application
Until now you read a lot about components which leads us to another important question: where to put your component. The term “single file component” is a pretty good rule of thumb. A file should only contain one component. So all of your components are stored in separate files. The name of the file should describe its content as good as possible. If your component renders a list of items, “list” is a good starting point for the components name. To better distinguish the different types of files in your application you can add the “.component.jsx” ending for a component. In the case of the list component the corresponding filename is “list.component.jsx”. The component stands obviously for a React component and jsx respectively tsx means that you are using JSX in this file.
The folder structure of your application largely depends on the expected number of components. It’s enough to put your components into a single folder named “components” if you have only a few of them. If their number grows you should group them feature wise. In addition to the components you should store all files in this folder also that can be mapped directly to the feature. Typical examples are hooks, stylesheets or unit tests. In order to keep your folder structure clean, you can create additional subfolders for each component and place the component file, the test for the component and its stylesheet there.
If your application for example has a login mask and a dashboard view you create two folders named “login” and “dashboard” and place the components in the corresponding folder. But what happens if a component belongs to multiple features?
Shared components
One core idea of React components is the ability to reuse them multiple times within an application. Some standard elements such as buttons, tables or popup windows are the same throughout your application and you can’t map them to a certain feature module. In this case the best solution is to build something like a shared component library within your application. All components that are used in more than one feature module are placed in a global “shared” folder in the application. As your application grows the number of shared components also grows. In the end this leads to a set of reusable components that are responsible for the look and feel of your application.
There are several things you can do with such a shared component library: To better visualize which components are available, how they are used and integrated in the application you can use a package such as storybook. storybook allows you to create a visual collection of components that acts as a catalogue and documentation.
If you have more than one application that shares the same look you can create a component library that is independent of an application. If your components are written in React a requirement for the applications using the components is that the application itself is written in React. You can overcome this requirement by creating a web component wrapper for the components which leads to truly framework and library agnostic components.
Whether you use plain React components or the web component variant, you should create a package which can be installed using a package manager such as Yarn or NPM. You can host the package in your company using some kind of package manager proxy, deliver it via a simple web server or via a git repository or host it publicly in the package manager repository. Since a couple of years NPM has a feature called private packages which allows you to distribute your packages to a smaller group of people.
Test your application
Create React App doesn’t only create a basic component but also a test for it. Additionally, it prepares everything so that you can start writing tests for your application with Jest, the testing framework built by Facebook. With the command “yarn test” all tests of your application are executed.
Jest was introduced to solve a couple of problems the existing solutions where facing. The most important one was performance. By definition unit tests should be small and run often. If it takes you a couple of minutes to run the tests of your application, you don’t run them often. In this case you won’t get instant feedback and it will get harder to fix failing tests.
Jest accomplishes the better performance compared to other test frameworks and runners by not using the usual browser infrastructure. Jest tests are executed in JSDOM instead. This is a simulated and much faster DOM environment that is independent from a browser and does not require a graphical interface to run tests.
To write a unittest for your components you should think of them as a function with certain input, the Props, and an output, the rendered HTML structure. You can also test the interaction of a user with the component when you render the component and then simulate the different events that are caused by the user interaction. React provides you with helper libraries that reduce the testing effort. If you want to make testing even easier than that, you can install additional packages such as the react testing library. This tool abstracts certain aspects of component testing furthermore. For example, the rendering process is much easier in this case and the same is true for locating elements within your component and interacting with them.
Unittests are used typically to test certain components in isolation. This means that you don’t test complete workflows and stay within the borders of your frontend application. That means that you leave out testing the communication with a server. All these issues are addressed in another set of tests: the end to end tests (E2E). Such a test requires a running test backend of your application and the ability to at least reset the database of this system on demand. It also might be necessary to simulate error behavior on the server to test exception and error cases. You can also use Jest for such tests, but it isn’t by far the best tool for this task. Other testing tools such as Cypress are much better because they involve real browser testing and a proper infrastructure for the E2E tests.
Central state management with Redux
The last topic I want to mention is a matter of a lot of discussions: central state management. This means that the state of your application is not spread over the components of your application but held in a central store. There is a good article of Dan Abramov with the title “You might not need Redux”. In this article Dan explains that a central state management approach might bring too much overhead for your application. Generally speaking for smaller applications, a solution like Redux for central state management might be too big.
However, for big applications with a lot of shared state between different components Redux might be a useful tool. A clear indicator that you should either use the context API of React or a library for central state management is, when you keep on passing information over deep component hierarchies. If this is the case, you hand over information the component itself is not interested in just because a child component needs this specific information. In this case the list of props for the components near the root component keeps growing.
Libraries like Redux are also using the context API but restrict the way data is accessed. In Redux you read data from a central store. Direct writing operations are not possible. If you want to change something in the store, you have to create a JavaScript object describing the change. This object is published to a structure called the dispatcher which deals with the change and produces a new store and leads to a rerender of the components. The core of Redux is synchronous. This means that Redux doesn’t know of anything like a web server. To deal with external data sources you need an additional element, called middleware, in form of a library such as Redux-Saga. There are multiple solutions available, each working with a different base technology:
- Redux-Thunk: Thunk is working with JavaScript Promises and is the most simple and lightweight solution for asynchronous operations in Redux.
- Redux-Saga: This library works with JavaScript generator functions to deal with asynchronous operations.
- Redux-Observable: The foundation of this library is RxJS. The downside of this solution is that you have to learn RxJS. If you master RxJS, Redux-Observable is the most flexible solution when it comes to asynchronous side effects in Redux.
The central store
Redux is an implementation of the flux pattern, describing central state management. In contrast to Flux, Redux only works with one central store. You are able to create independent sections of this store in order to keep the modules of your application separate. Every feature module of your application can have its own reducer function, which is nothing more than a big switch-case statement. The reducer function receives the previous state and an action object and generates the new state of the application. The module reducers are combined in a central root reducer. You can place the module reducers into a separate folder in the module folder, called “reducer” for example. The name of the file should describe the content as precise as possible. If your login module has its own reducer the reducer could be named login.reducer.ts.
To access the information in the store you can use the useSelector function which accepts a function reading the state. This function is called a selector which is also stored in a file on its own. Since selector functions tend to be relatively small, you can place multiple of them into one file.
Changing the state
As I already mentioned, the state is changed with actions. You could use any object structure as an action in Redux and create a new state version out of it. There is a suggestion on how to write your actions, called the Flux Standard Action. It describes an action object with a few simple rules:
- The action has to be a plain object
- The object has to have a type property
- The object may have the following properties: error, payload and meta
Typesafe-actions is a library that assists you in creating action objects that are conform to the flux standard action. It also provides you TypeScript support for the action structures that can be used in your reducer functions.
If you are working with synchronous operations in Redux you usually need only one action. When it comes to asynchronous operations such as server communication you end up with up to three actions: one that triggers the operation, one that is dispatched if everything went positive and finally one to represent an error case.
Debugging Redux
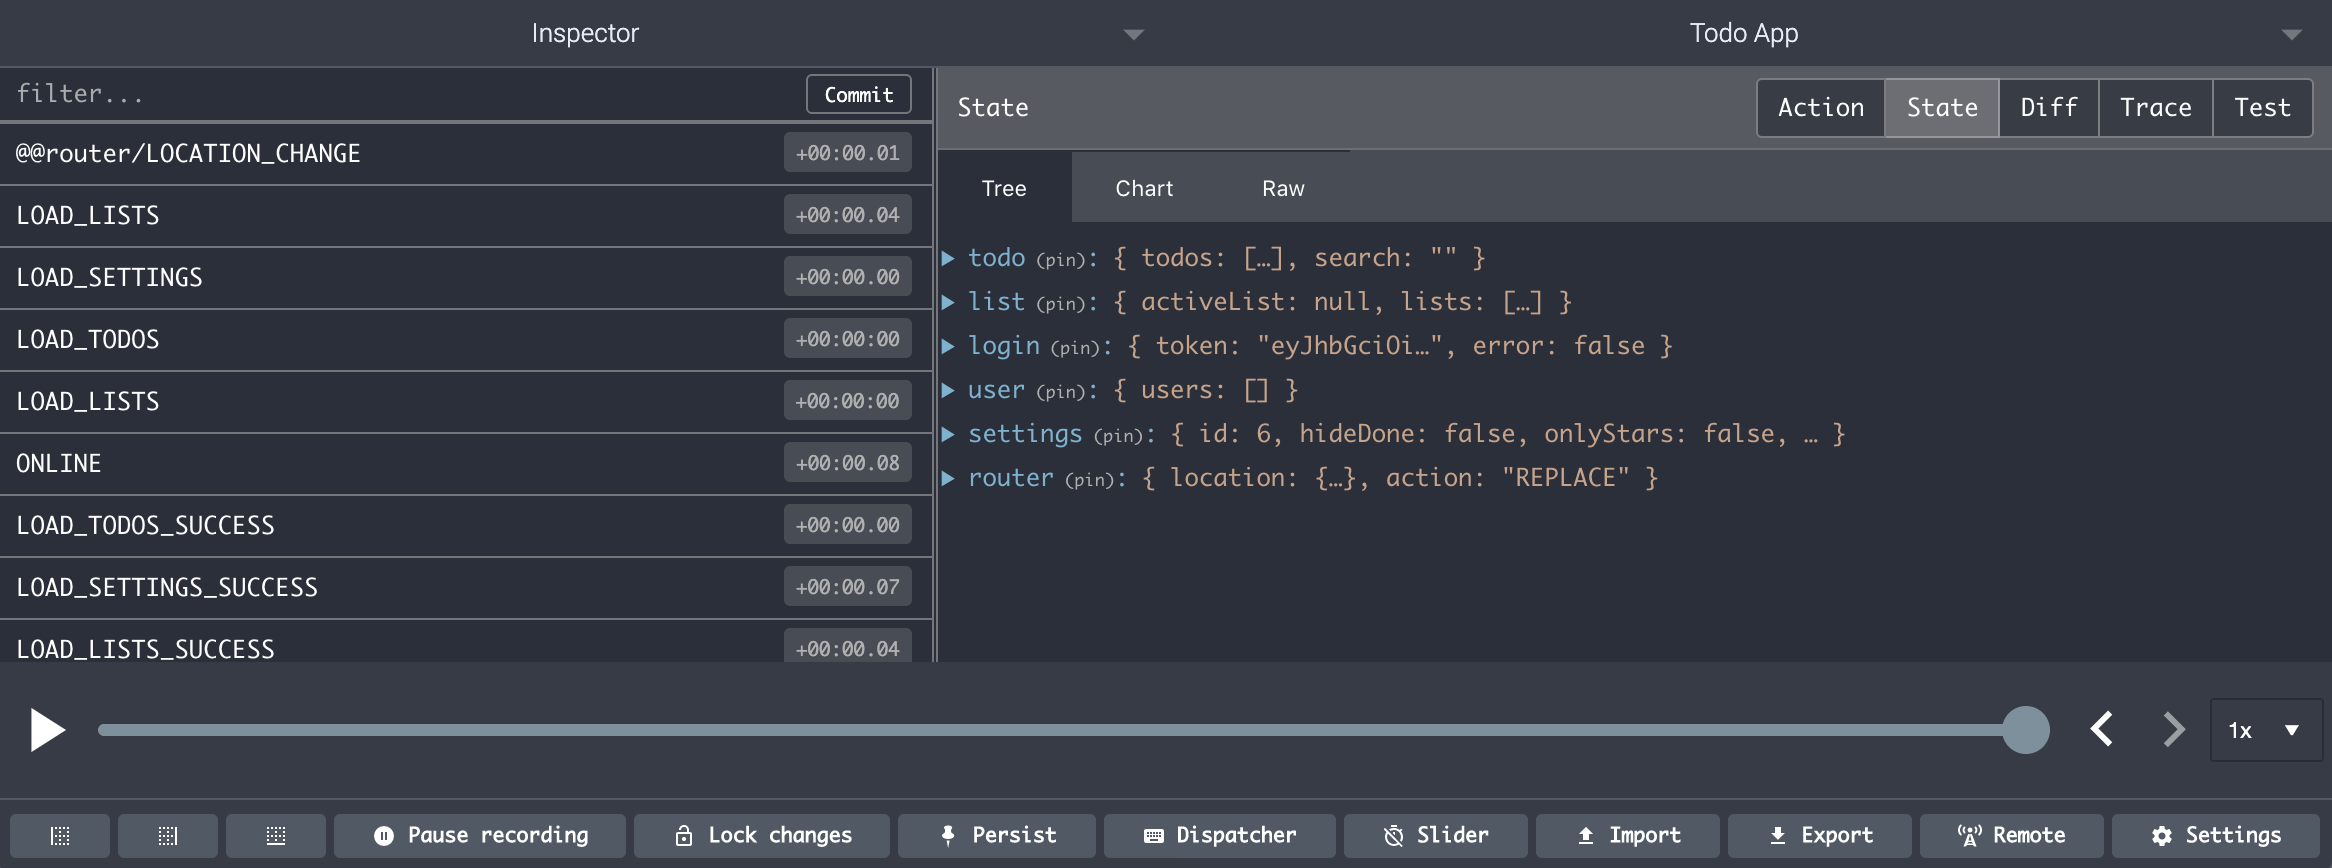
There is a very useful browser extension named Redux DevTools (Fig. 1) which allows you to inspect your Redux application in detail. You can see every single action that is dispatched within the application and the effect the action has on the state of the application. This tool is especially helpful for bigger applications with a large number of actions because you can see the order of the actions, the state at every given time and you can do time travel debugging and replay the actions.
React is a relatively lightweight library to create user interfaces. As such it only provides little structure. This has its advantages and disadvantages. React gives you a lot of flexibility but it needs some guidance and rules for the setup of a clean application. You can solve this issue by defining some coding and architecture conventions.
Adding further technologies like TypeScript and the use of tools like eslint for static code analysis allow you to enforce better code quality and build even bigger and more business-critical applications with React.