
When Contao first saw the light of day in 2006, it was called TYPOLight. But the name caused some confusion, as many people immediately pictured a slimmed-down version of another well-known CMS. This does not do Contao justice. The CMS is a full-fledged system that doesn’t need to hide behind big names on the market and can be used for enterprise projects without hesitation. Therefore, the name was changed to Contao in 2010. Its TYPOLight past can still be seen in the database, as all tables start with tl_. This brings us to the technology. Contao is written in PHP and uses a MySQL database to store its contents. Since the release of version 4 in 2015, it uses Symfony as its framework. At the time of writing, the project has already reached version 4.11 and long-term support is also available. We want to take a look at what you can do with this open source CMS. Let’s start with the installation.
Everything is under control with the manager
Contao can be integrated into an existing Symfony project [1], but you can also use the Managed Edition, which takes care of the Symfony configuration. Installation is done via Composer, but if you aren’t comfortable with the console, don’t worry. The Contao developers created a useful tool; the manager [2] serves as a graphical interface for Composer and system maintenance tasks (for example: clear cache). To use it, simply download a file and copy it to the webserver. The user will be guided through the installation. With the help of the manager, the packages can be used and managed, (Fig. 1) or extensions can be installed. Composer is used in the background for this, but you can continue using the command line in parallel. In a shared project, developers can use tools they are familiar with, while designers can use a graphical interface. Composer sometimes requires a lot of memory, which may not be available in every hosting package. But Contao has a solution for this too: the Composer Resolver Cloud [3]. A composer.json file can be sent there. The cloud handles the dependency resolution and returns the finished composer.lock file. This process is transparently integrated into the manager. This means that Contao can also be installed on webspaces with less powerful hardware. Once the files are installed via the Contao Manager or the command line, the install tool must be called to enter the database and create tables. The reason this is done in a separate tool has historical reasons, as the Installtool has been around much longer than the Contao Manager. In the future, tasks from the Installtool will likely be integrated into the manager. An admin account is created in the Installtool, which can be used to log into the backend.
IPC NEWSLETTER
All news about PHP and web development
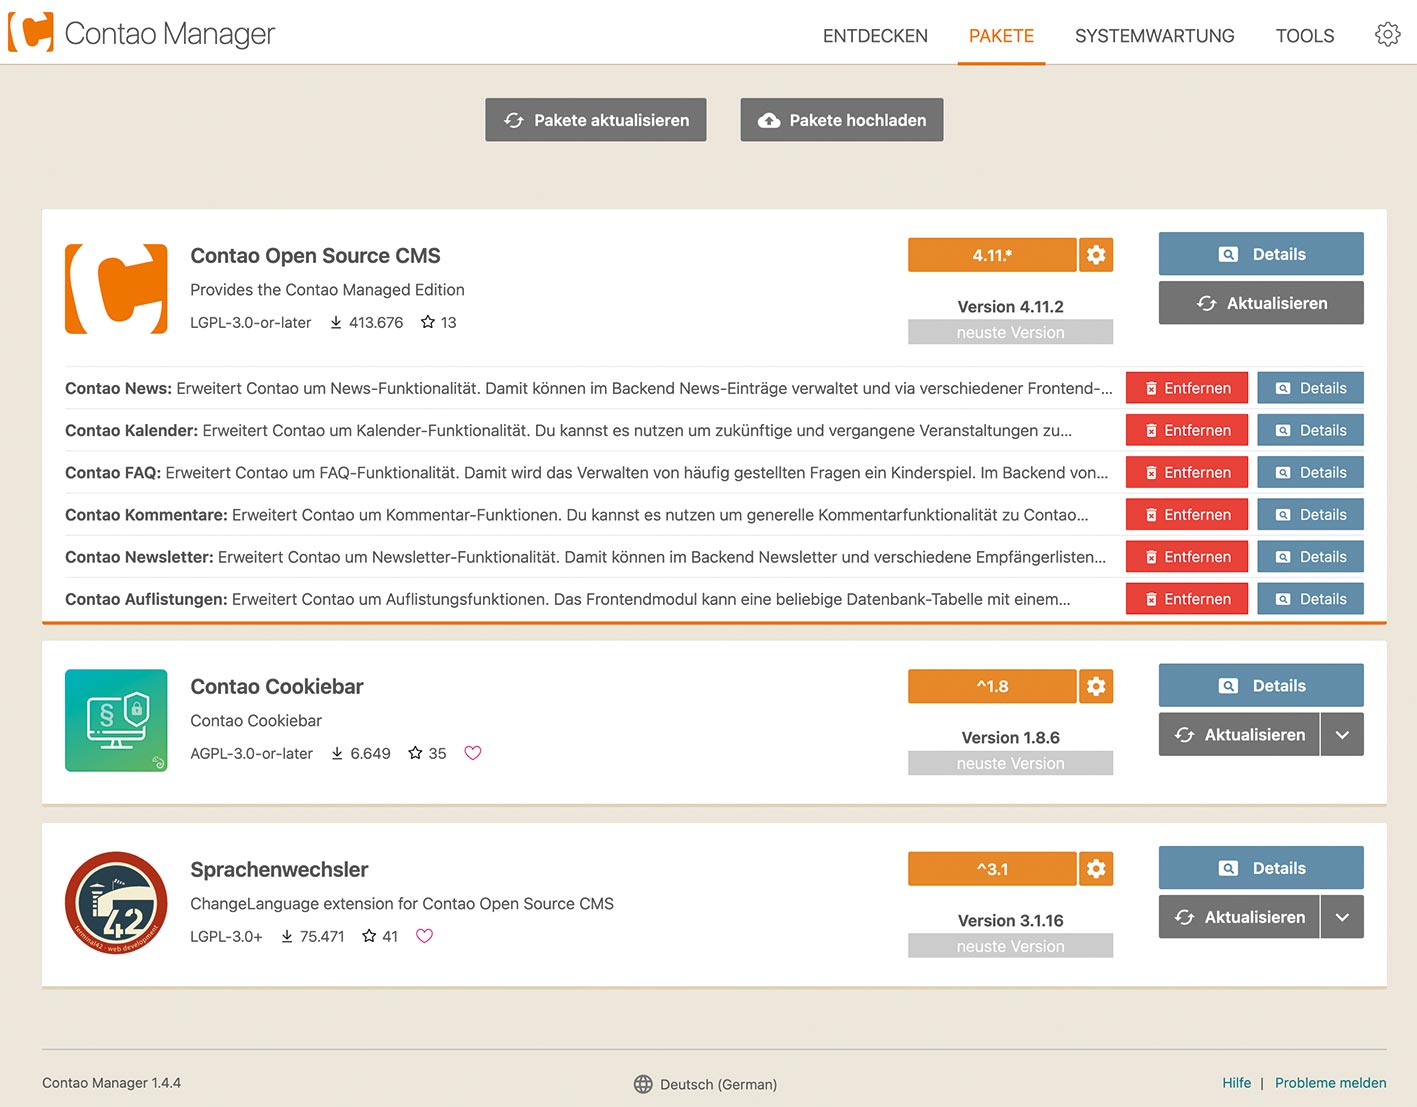
Fig.1: Package management in Contao Manager
Website design made easy
In the backend, navigation is located in the left column and is divided into four areas: CONTENT, LAYOUT, USER ADMINISTRATION, and SYSTEM. Web designers will spend most of their time in the LAYOUT area, creating modules or page layouts, and customizing templates. Editors will manage content, consisting of articles, news, events, and more. USER MANAGEMENT deals with frontend and backend users. Under the SYSTEM tab, you will find the file management, general settings, and log.
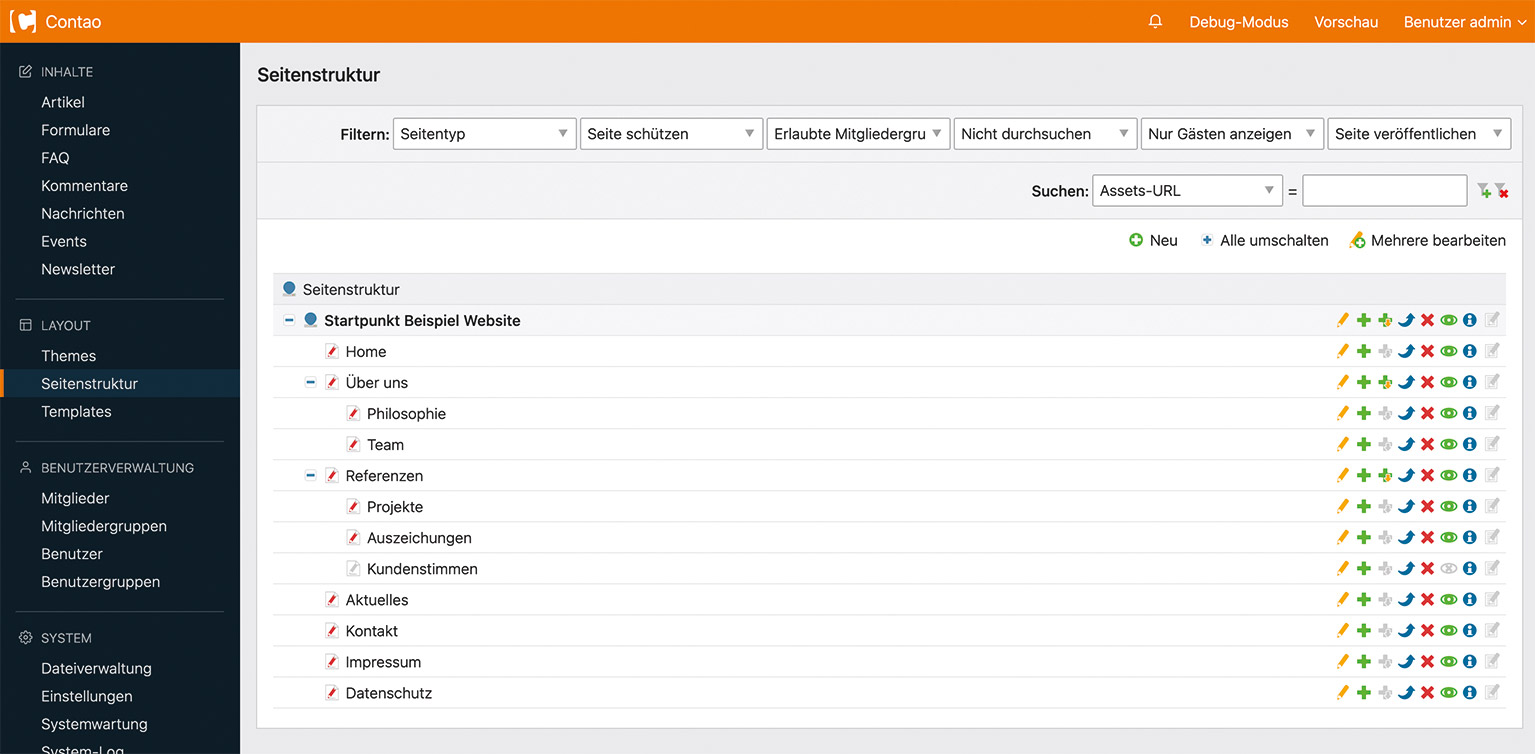
Fig. 2: Page structure
In the menu item PAGE STRUCTURE, you can define the website’s structure. The root of the page tree is a starting point where the language and website domain is determined. With Contao, you can manage multiple domains in one installation. In the case of a multilingual website, a page tree is created for each language; Figure 2 shows an example of this type of page structure. The name and URL can be determined for each page and you can enter the metadata needed for search engines. If you leave the URL field empty, Contao automatically generates an address based on the page name. For example, “About us” becomes about-us. The suffix .html is appended to each page address, which can be deactivated from a setting at the starting point. You can also set whether nested URLs are generated for nested pages, or whether URLs should be output without hierarchy. You can configure whether a page is published by manually clicking on the eye icon. This mechanic exists for most elements in Contao. Generally speaking, the operation is very consistent. The icons on the right side of the figure run throughout the system. The pencil will take us to the settings, the green plus sign creates a copy, the blue arrow lets us move, and the red cross deletes an element.
You can also copy an entire page tree including all of its content. This is especially useful when creating a multilingual website. First, finish creating the website in the main language, then you can copy and translate it.
After defining the structure of the website, you can work on the appropriate theme. This consists of page layouts, modules, templates, and CSS, which allow you to create any number of page layouts. These can be assigned to individual pages in the page structure, with top pages giving their layout to the bottom pages. For example, a default layout can be assigned to the starting point, which is replaced by a more specific layout for certain pages. In the page layout settings, we define the basic structure (Fig. 3) and which layout areas (header, footer, left column, right column) should be included on the page along with the main column. There is a corresponding container for each element in the page’s HTML. You can fix the width or height of elements, but it’s recommended that you manage this with CSS.
You can also define your own layout areas. These can be placed relative to a standard container or freely in the template. You can also select which CSS and JavaScript files you want to include in the page layout. Contao compiles SASS and LESS files on request and, if needed, you can activate Google Analytics or Matomo in the page layout. Service IDs and other settings are entered into a template. The advantage of this is that the same configuration is used in all page layouts.
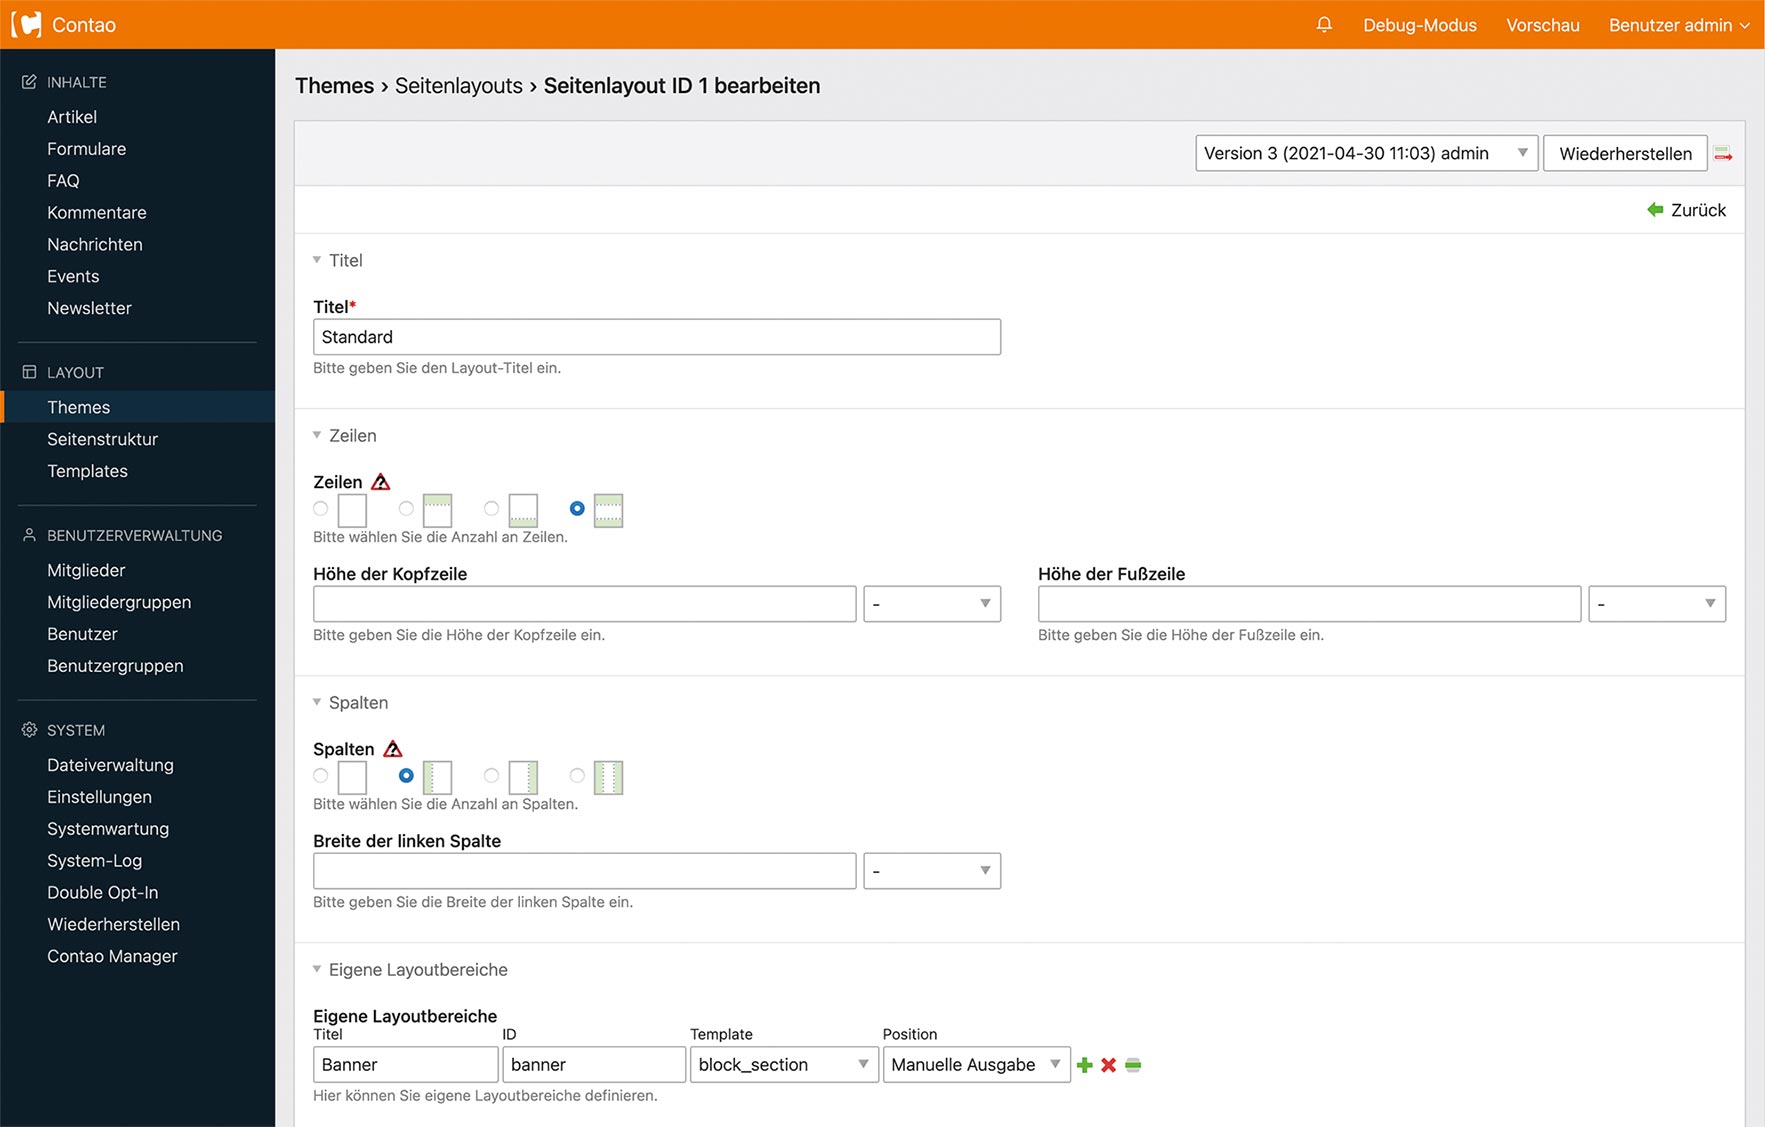
Fig. 3: Area settings in the page layout
To make pages lively, Contao offers frontend modules in the layout areas (Fig. 4). We create the modules in a separate view. Each module has certain options according to its type. For example, in the Navigation Menu module, you can set which level the page tree navigation should start and stop at. For each module, Contao executes the corresponding PHP code and creates a rendered template as HTML. Then, the designer’s task is formatting it with CSS. Templates can be easily customized in the backend (Fig. 5). Even non-developers can influence element design. The original template is not overwritten, instead, a copy is created. If this is deleted, then the original is used again. There’s no danger of breaking anything. Table 1 shows which modules Contao comes with. If the core modules are not enough, you can get more with extensions. Of course, developers can extend existing modules or program their own.
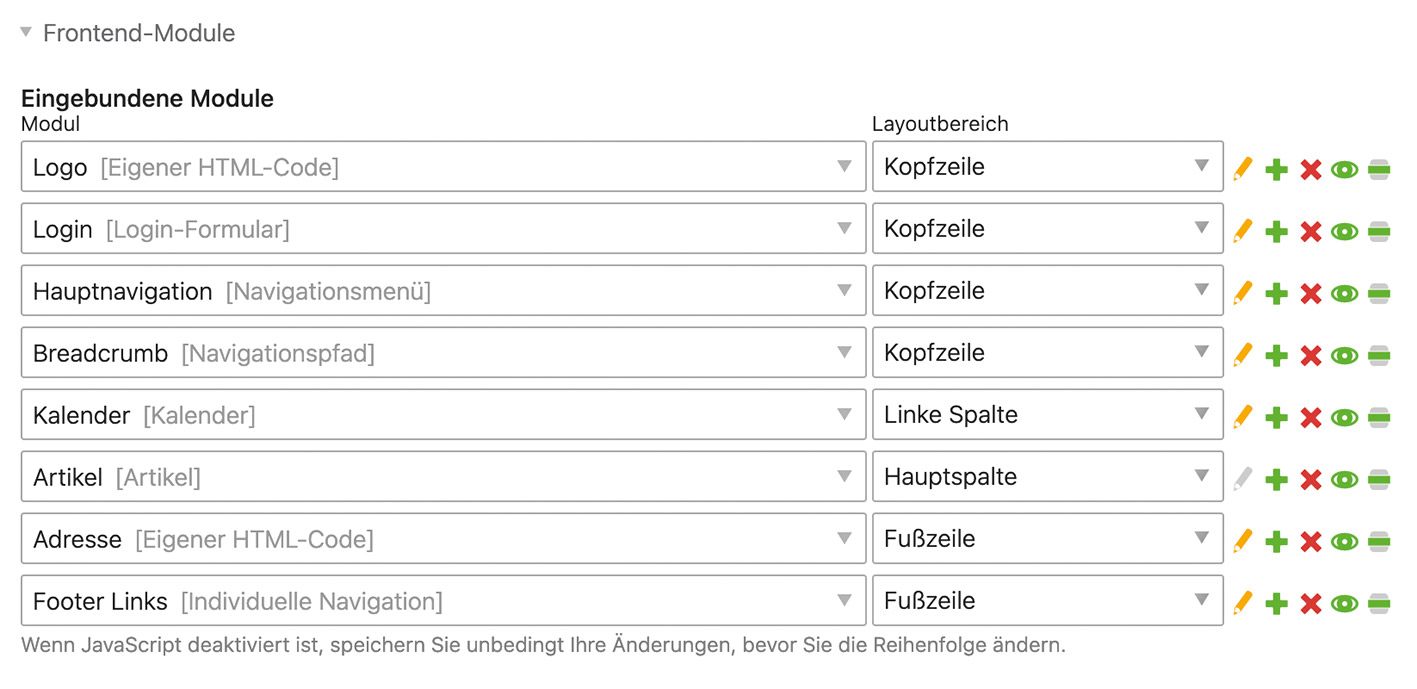
Fig. 4: Frontend modules in the page layout
| Name | Description |
|---|---|
| Article | Outputs content created under the Articles menu item. |
| Navigation menu | Outputs the whole page tree as a link list. Suitable for the main navigation, for example. |
| Individual navigation | Creates links to selected pages. Suitable for general links in the footer, for example. |
| Custom HTML code | As the name suggests, you can fill this module individually with HTML code. Insert tags can be used for this. For example, the insert tag {{insert_module::10}} inserts the module with the ID 10. This way, you can create nested layouts. |
| Search engine | Allows you to search the website. Contao creates the search index automatically. |
| Navigation path | The path to the current page (Breadcrumb). |
| Login form | Allows members (as frontend users) to log into the website. |
| News list | Outputs the list of news. |
| News reader | Outputs the content of a single news item. |
| Calendar | Outputs a calendar for the events created under EVENTS. |
Table 1: Examples of frontend modules in Contao
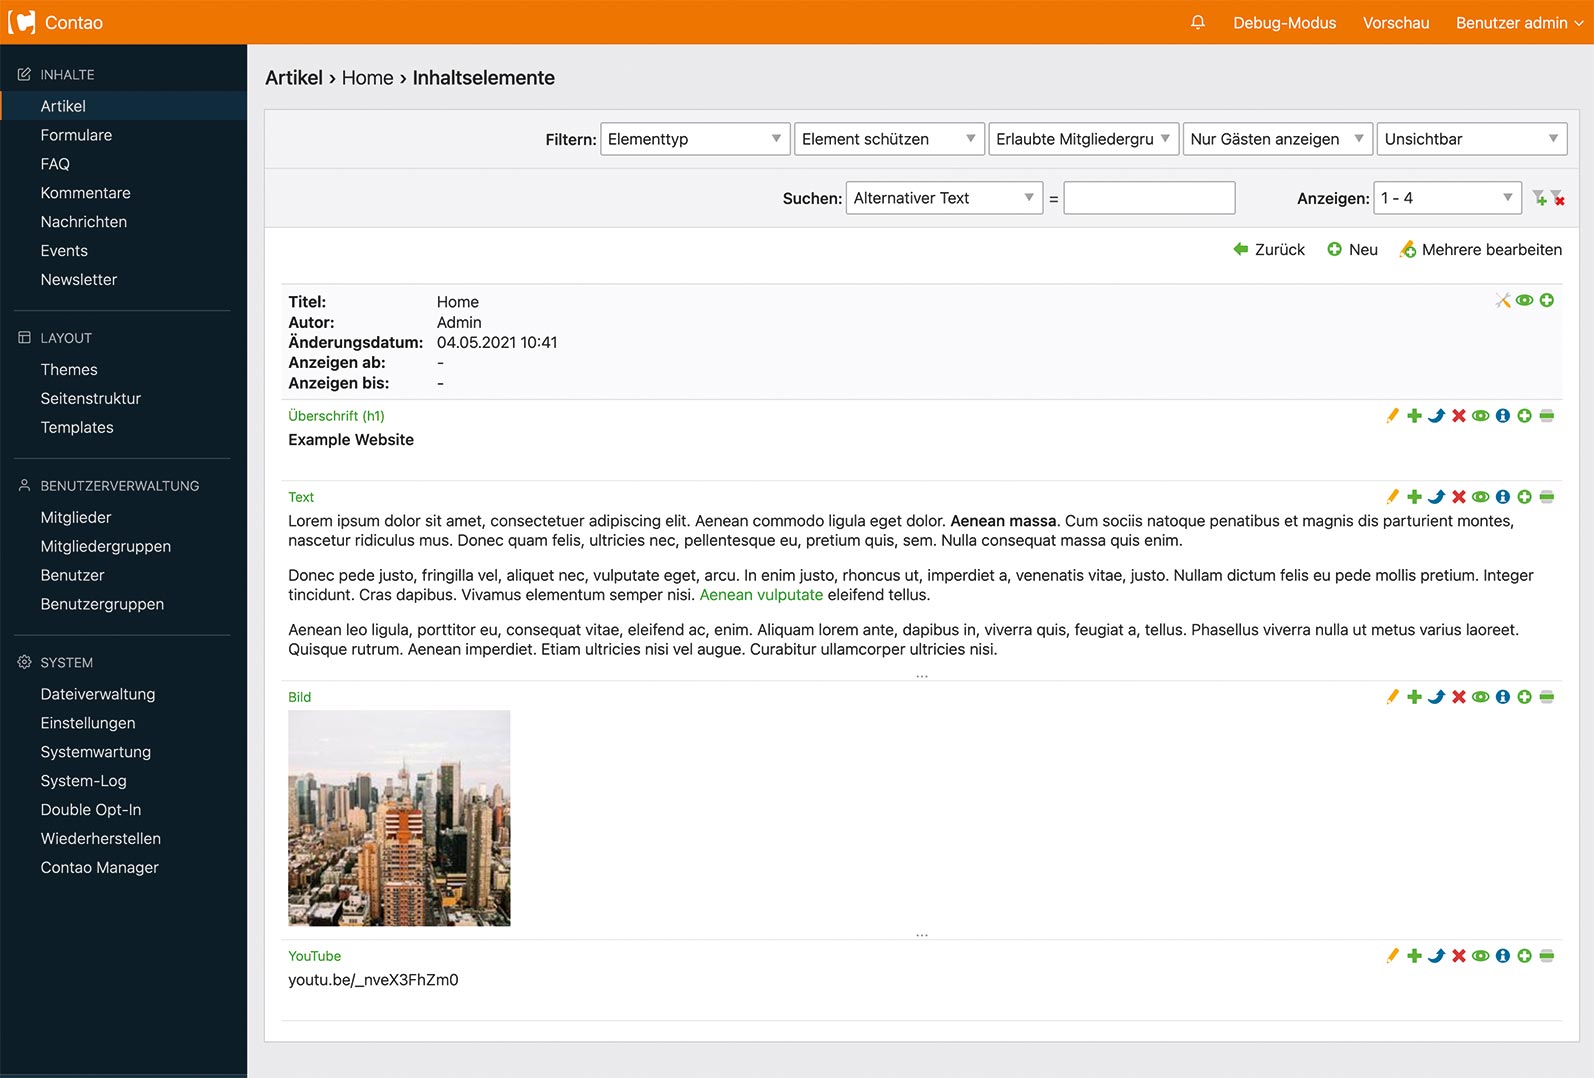
Fig. 5: The template editor
IPC NEWSLETTER
All news about PHP and web development
Content is King
Website content is managed under the menu item CONTENT. Articles are the most important of these and can be created on each page, according to the positions selected in the page layout. Articles consist of content elements (Fig. 6) and, similar to modules, are configured with different options depending on their type. They can be hidden or displayed with the eye icon and can be dragged and dropped. Each element has a template that can be customized if needed. Table 2 shows examples of content elements included in the core. More are available in the corresponding extensions. People who can program can create their own, of course. The WYSIWYG editor TinyMCE is available for texts (Fig. 7).
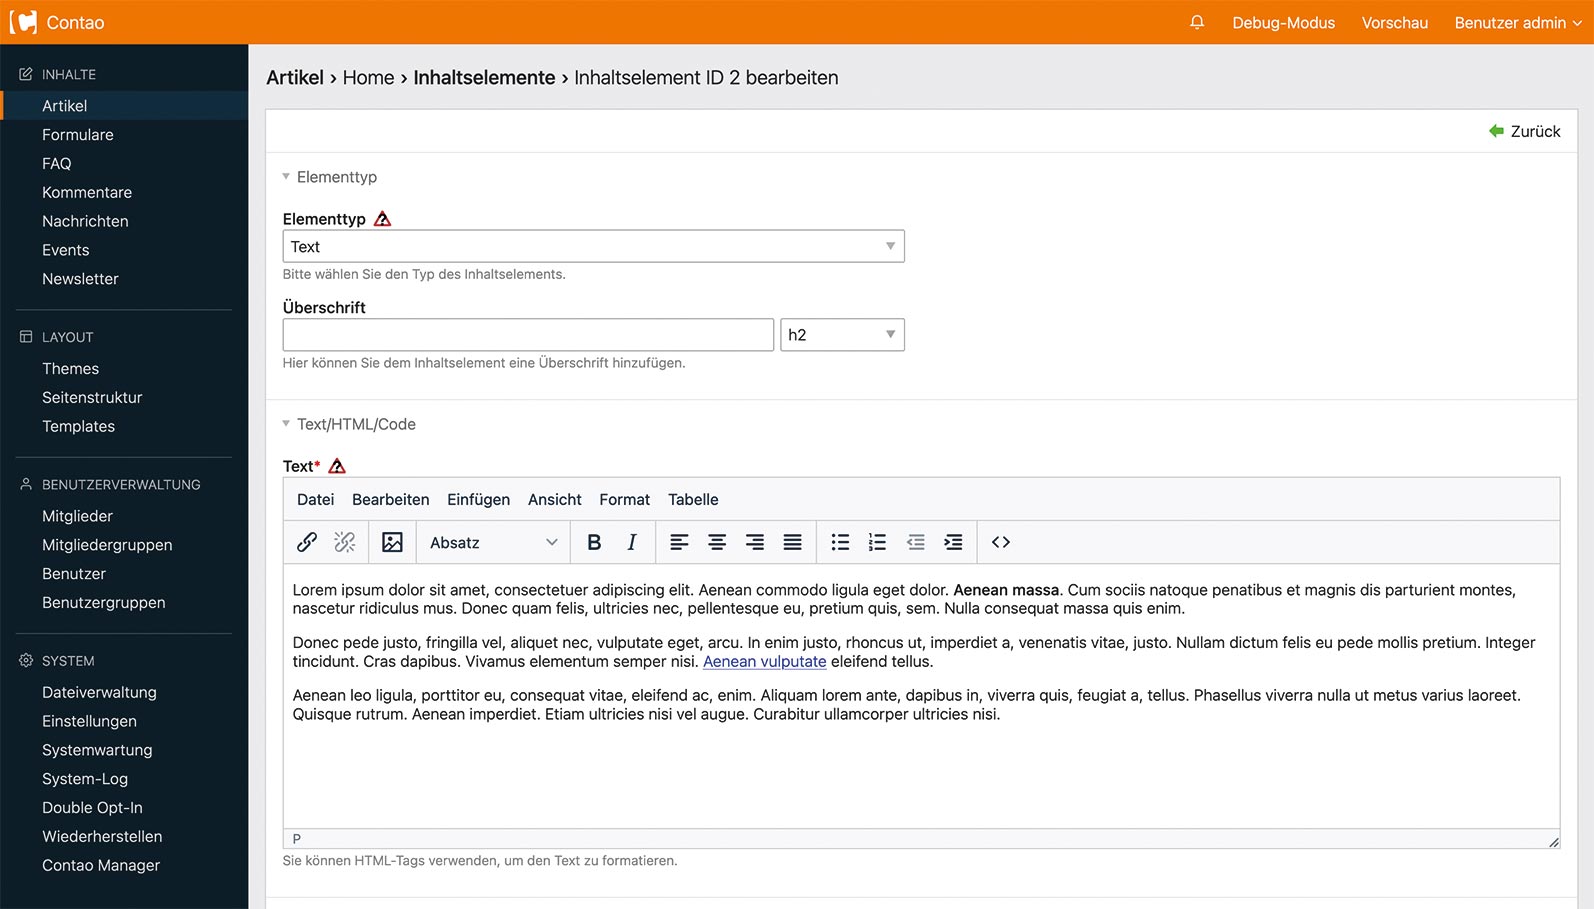
Fig. 6: The content elements in the backend
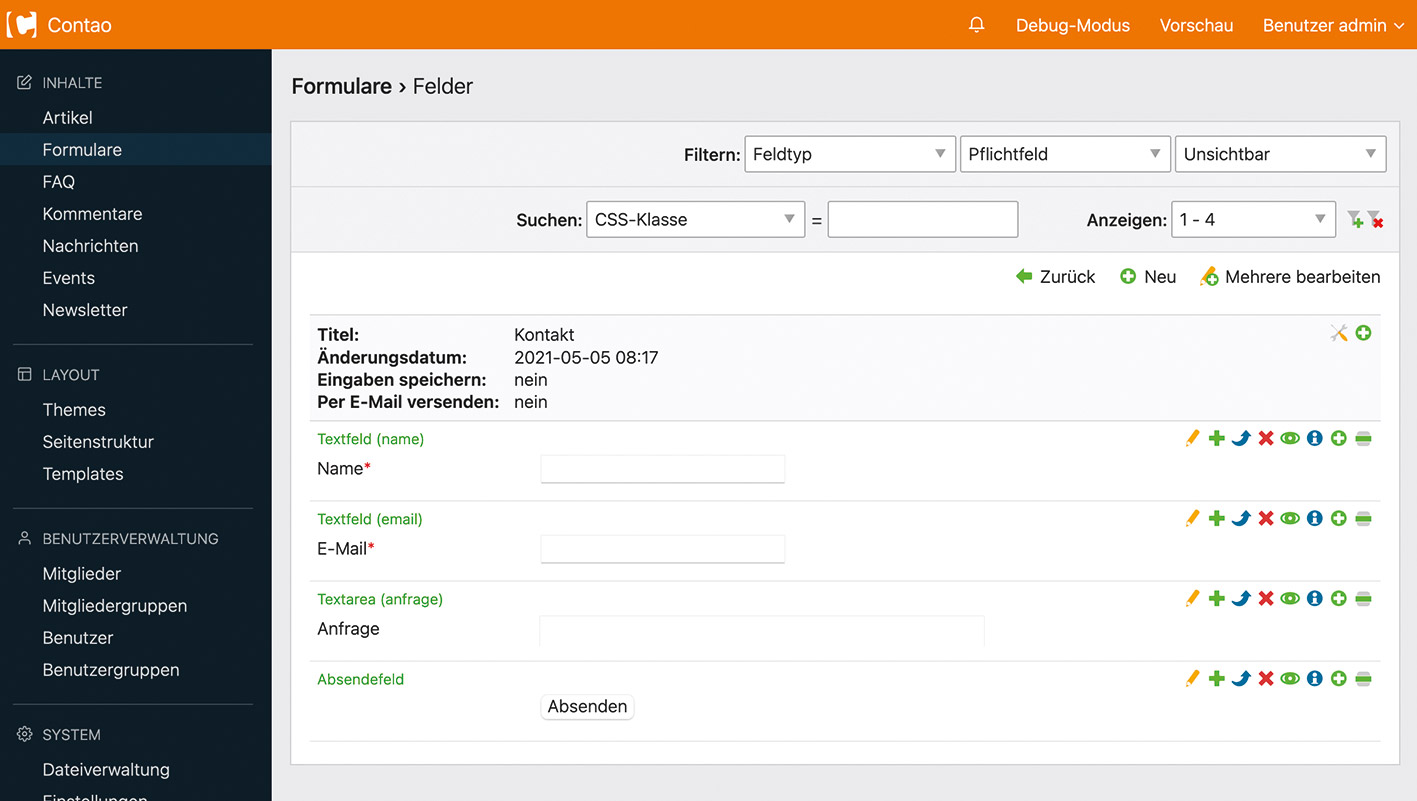
Fig. 7: Contao’s WYSIWYG Editor TinyMCE
| Name | Description |
|---|---|
| Headline | A headline |
| Text | A text area editable with a WYSIWYG editor (TinyMCE) |
| Image | An image from the file manager |
| Download | A file offered for download |
| Accordion | Openable and closable containers |
| Slider | A slider for images or other content elements |
| Gallery | An image gallery with Lightbox |
| HTML | HTML code |
| Code | Codeblock with syntax highlighting |
| Markdown | Rendered markdown |
| YouTube/Vimeo | A video from either portal |
| Module | A frontend module |
| Form | A form from the form generator |
Table 2: Examples of content elements
Besides articles, Contao brings other types of useful content, such as news. You can create as many archives as you’d like. Individual messages can be created here, each with an associated teaser text and image. News content consists of content elements. Per module, the News List and News Content are included in the page layout or in an article. You can also allow commenting on news, so NEWS can be excellent as a blog.
As the name suggests, events can be managed under Events. You can specify a start and end time for each event. The content is designed with content elements. Events are displayed in the frontend either as a list or a calendar. At this point, we should also mention the form generator. This allows forms to be composed of typical elements, such as text fields, checkboxes, radio buttons, and a select menu (Fig. 8). Input is validated on the client and server side. Each form automatically receives a CSRF token. The form’s content can be sent via email and stored in the database. This way, you can create both simple and more complex forms. Contao also provides a simple newsletter system. The CMS offers built-in versioning for content elements, modules, messages, forms, and practically all other website components. You can quickly revert to a previous state and restore deleted elements.
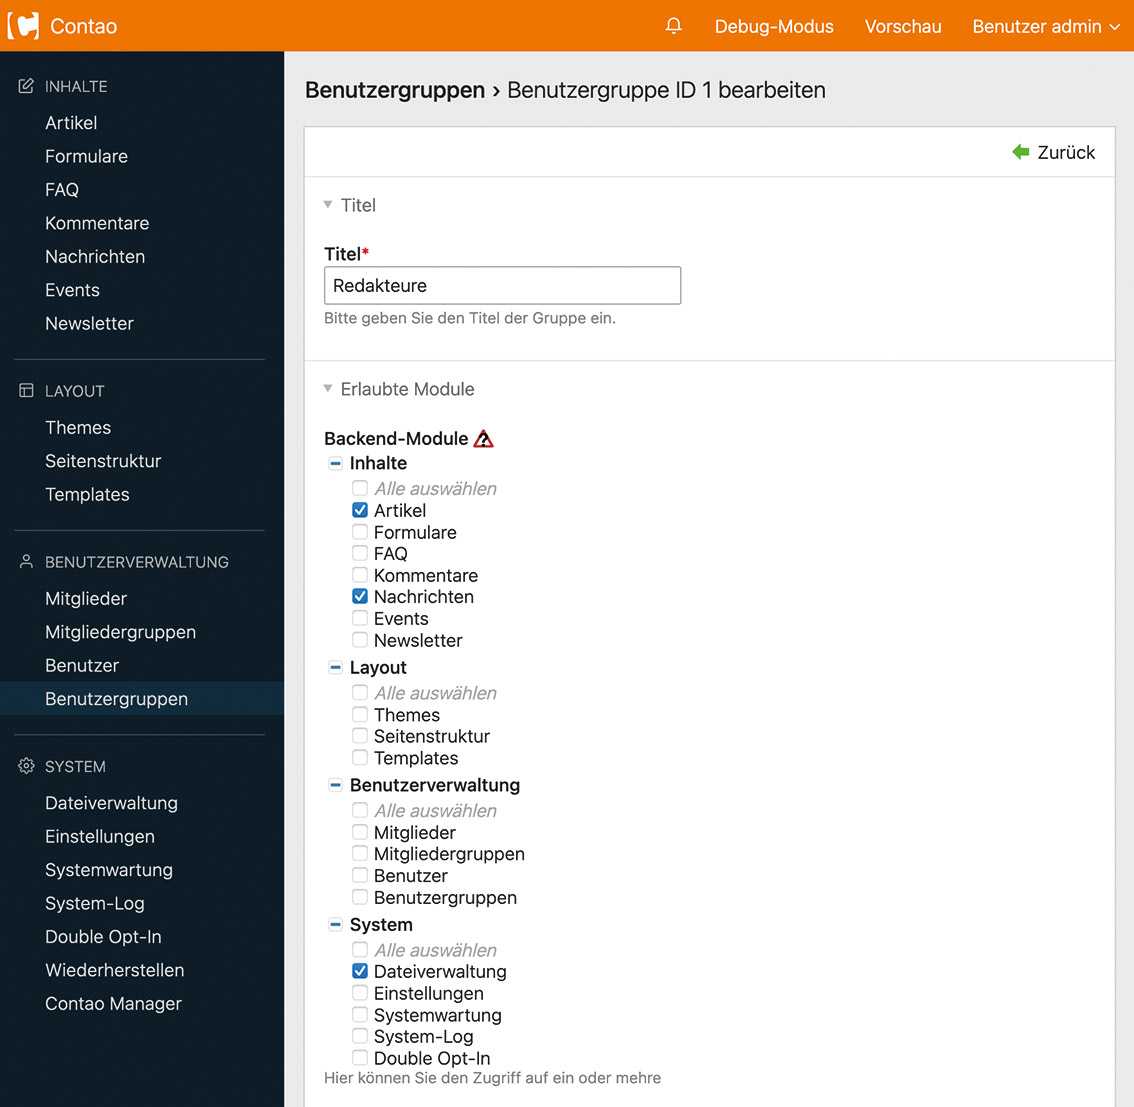
Fig. 8: The form generator
In FILE MANAGEMENT, uploaded images and documents are displayed in a tree structure; folders and files can be moved with drag and drop. File management is database-driven. If a file is renamed or moved, references in the content elements or modules will not be lost. Contao also offers support for responsive images; different image sizes can be created and assigned to images. You only have to upload an image in its largest resolution and Contao will automatically create smaller versions and output the HTML for the responsive images. You can mark a specific area in the image for cropping. Optionally, you can also activate lazy loading.
The topic of web accessibility is becoming increasingly important. Contao brings the basic requirements. Semantic HTML5 elements such as header, main, aside, footer, nav, and article are used in the templates. Microdata is also used where it is wise to do. For example, Breadcrumbs are provided with:
itemprop="breadcrumb" itemscope itemtype="http://schema.org/ BreadcrumbList"
You can specify a title and description for each page. Navigation is generated as lists and can be operated using the tab key. If needed, you can set an individual tab index for specific menu items and assign a keyboard shortcut to them. Each navigation also contains an invisible Skip link. Form fields are created with labels and can be equipped with a tab index. You can provide images with an alternative text and file, either globally in the file management or when including images in content elements.
What matters is people
There are two types of users in user management: Members and users. Members are frontend users. Contao lets you create a locked area that is only accessible to specific members. In the page structure, you can set which pages are shared with certain member groups, and which articles and content elements can be provided with access security. Contao provides log-in and registration forms in the form of modules. You can also activate two-factor authentication if you’d like. In Contao, users are defined as those who use the backend. You can create any number of groups and assign them specific rights. For each user group, it is possible to configure which pages can be edited, what backend areas are accessible (Fig. 9), which content elements are available, and what fields are enabled in input screens. Only displaying the necessary elements for a specific group serves a security purpose, but also increases user-friendliness. Users can be assigned to multiple groups. Their rights will be merged and a flexible rights system will be put into place. You can also activate two-factor authentication for backend users.
An open source project is only worth as much as the people who look after it. Luckily, Contao has a very productive community: There are reliable core developers and many people who further develop the CMS via GitHub or provide extensions on Packagist. Questions from users and developers are answered quickly in the official forum. Events such as the Contao Conference, the Contao Camp, and the Contao Agency Day are held throughout the year. Contao TV became an official video format recently. The CMS is supported by the Contao Association, an official support association that anyone can become a member of for a fee.
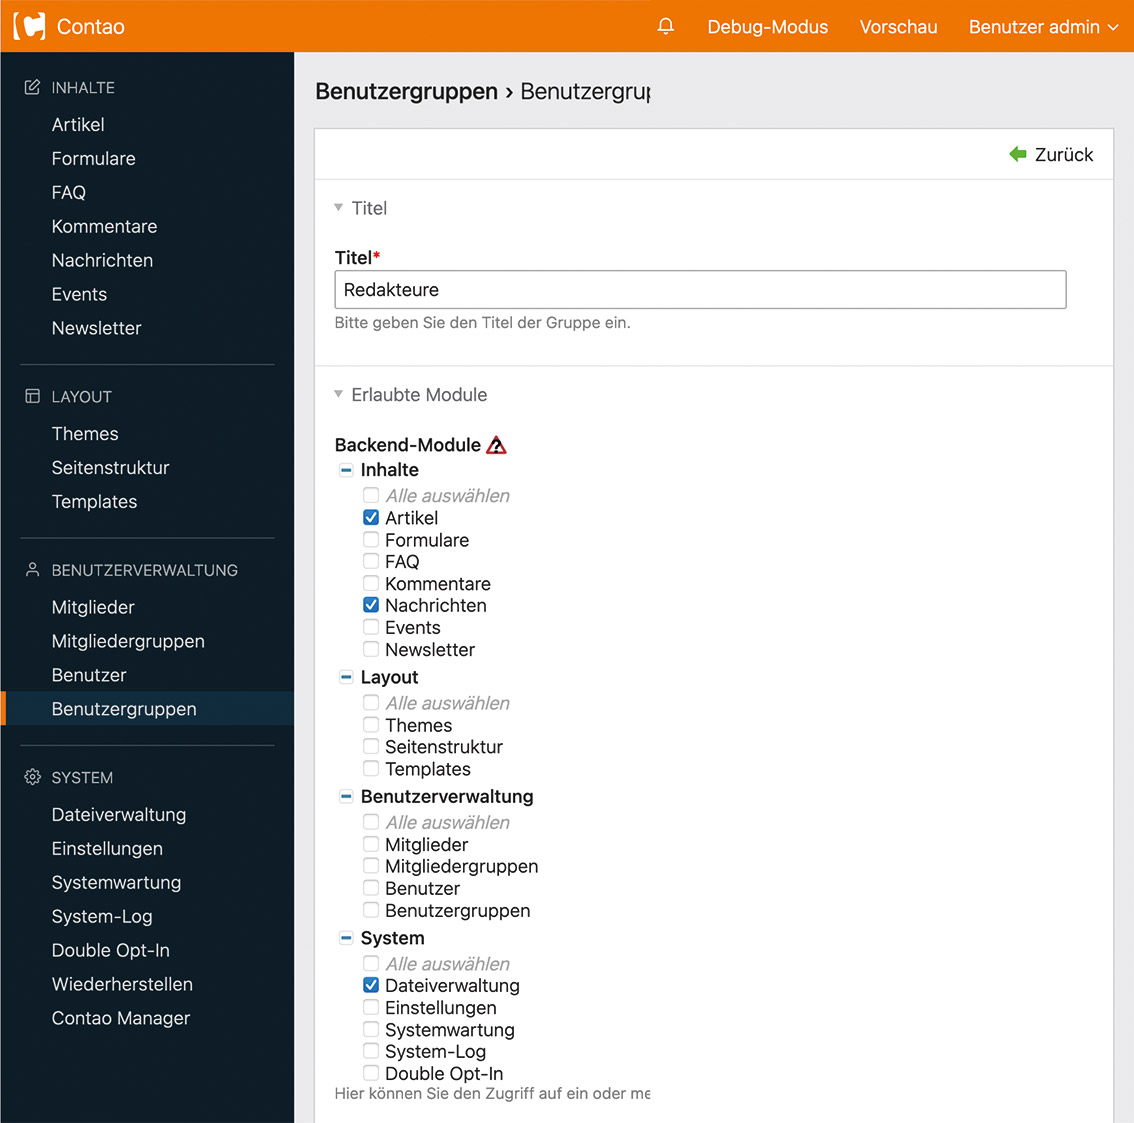
Fig. 9: User group settings
As you like it
One of Contao’s greatest strengths is its easy extensibility. Since Symfony is used as a basis, developers who have mastery of this framework can program in their usual manner. Contao also comes with its own framework that was already in use before it integrated with Symfony. You can find extensive documentation at [4]. In the following, we will take a look at a small introduction to development with Contao.
One basic concepts is the DCA: the Data Container Array. It decides how table entries are managed in the backend. For every table, there is one DCA. You can extend existing DCAs or create completely new ones. Basically, the DCA is an array that configures how the table entries will be ordered in the backend, what search and filter options are available, what operations (for example: edit, copy, delete) can be applied, and what fields are available to be edited.
$GLOBALS['TL_DCA']['tl_product'] = [
  'config' => [
    // ...
  ],
  'list' => [
    // ...
  ],
  'fields' => [
    // ...
    'description' => [
      'label' => &$GLOBALS['TL_LANG']['tl_product']['description'],
      'exclude' => true,
      'search' => true,
      'inputType' => 'textarea',
      'eval' => ['mandatory' => true, 'rte' => 'tinyMCE',],
      'sql' => ['type' => 'text'],
    ],
  ],
  'palettes' => [
    // ...
  ],
];
Listing 1 shows an example configuration for a fictional field description of a product table. The field’s label is entered under label. Here, a translation is referenced. The entry under exclude determines if the field will be enabled in the user administration. The search parameter specifies that the content is searchable in the backend. The inputType determines which HTML element is used. Further options are available under eval. In our example, we specify that this is a required field and the WYSIWYG editor should be used. Lastly, the sql entry specifies how data is stored in the database. You can use either the options from Doctrine or enter SQL directly. In addition to the configuration, you can register callbacks that trigger for certain events. For example, it’s possible to execute a specific function when a certain value changes.
It takes some time to get used to the concept of DCA and its manifold configuration options. But once you’ve internalized it, it is incredibly powerful. Almost anything you can imagine in data management is possible with DCA. Contao uses models that work similarly to Doctrine entities to access the table entries. In contrast to Doctrine’s data mapper pattern however, it uses the active record pattern. Therefore, there is no entity manager or repositories. Database operations take place directly in the model classes. See the following code for an example of this point:
$product = ProductModel::findByPk(1);
$product->description = 'Lorem ipsum';
$product->save();
Here, the product with ID 1 is loaded from the database, a description is set, and the product is saved.
IPC NEWSLETTER
All news about PHP and web development
As mentioned previously, developers can create their own frontend modules and content elements. This is done by creating controllers that inheret from AbstractFrontendModuleController or AbstractContentElementController. In the controller, you execute the necessary logic and ultimately, render a template. Contao comes with its own templating engine that also allows inheritance. The template used by the frontend module or content element is determined by its name. For example, the ProductListController uses the mod_product_list.html5 template. Listing 2 shows an example implementation of a frontend module that outputs a list of products. In Contao, you can intervene in the systems logic via hooks. This works similarly to Symfony Events. The developer may define and assign parameters to a method, and excecute this method for a specific event. Changing these parameters will influence the system’s behavior. Hooks can be registered using annotations. Listing 3 shows a hook which adds an additional Time field with the current date and time added.
/**
 * @FrontendModule(category="product")
 */
final class ProductListController extends AbstractFrontendModuleController
{
  protected function getResponse(
    Template $template,
    ModuleModel $model,
    Request $request
  ): ?Response {
    $products = ProductModel::findAll();

    $template->products = $products;

    return $template->getResponse();
  }
}
/**
 * @Hook("prepareFormData")
 */
final class PrepareFormDataListener
{
  public function __invoke(
    array &$submittedData,
    array $labels,
    array $fields,
    Form $form
  ): void {
    $submittedData['Time'] = (new \DateTime())->format('d.m.Y H:i:s');
  }
}
<?php $this->extend('block_searchable'); ?>

<?php $this->block('content'); ?>
  <ul>
    <?php foreach ($this->prodcuts as $product): ?>
      <li><<?= $product->title; ?></li>
    <?php endforeach; ?>
  </ul>
<?php $this->endblock(); ?>
Conclusion
Contao has developed brilliantly over the past 15 years and is far from being a “light system” anymore. Thanks to intuitive concepts, creating websites is uncomplicated and flexible for implementing both small and large projects. Its core already includes many things that in other systems would have to be installed via extensions. With the Contao Manager, a unique graphical interface for package installation with Composer has been created. Thanks to Symfony and its own well-thought-out framework, extensions can be created quickly.
Links & Literature
[1] https://docs.contao.org/dev/getting-started/initial-setup/symfony-application/
[2] https://docs.contao.org/manual/en/installation/contao-manager/