Testing is more than just running the tests! We have already explained this statement in detail in Part 1 of our series.
The simplified flow from “Test Case Management” to “Test Planning”, “Test Execution” up to the “Final Reports” shows the wide spectrum of activities in the QA environment.
So that these things can be carried out in a controllable manner, there are tools such as “TestRail”.
The test management software allows to create a clean and filterable test catalog with detailed instructions for the execution of tests.
IPC NEWSLETTER
All news about PHP and web development
Together we have created such a test catalog in part 1, which we now use accordingly for further planning.
Now that we have developed our tests and entered them as optimally as possible in TestRail, it is time to prepare them for execution by means of “Test Runs”.
Creating Test Plans
There are several options available in TestRail for planning. The most basic option is to create a simple test run (“Test Run”), which we can create under the menu item “Test Runs & Results”. This test run will later contain various tests from the catalog, selected either manually or automatically via filtering.
However, if we want a more structured approach, TestRail also offers the possibility to create a test plan. A Test Plan can contain any number of Test Runs, allowing for thematic structuring or subdivision.
Test Plans and Test Runs can be combined in different ways. For example, as in the definition, a Test Run can be a single run with a completed result. A test plan could then contain several runs until finally everything was OK and the feature can be accepted.
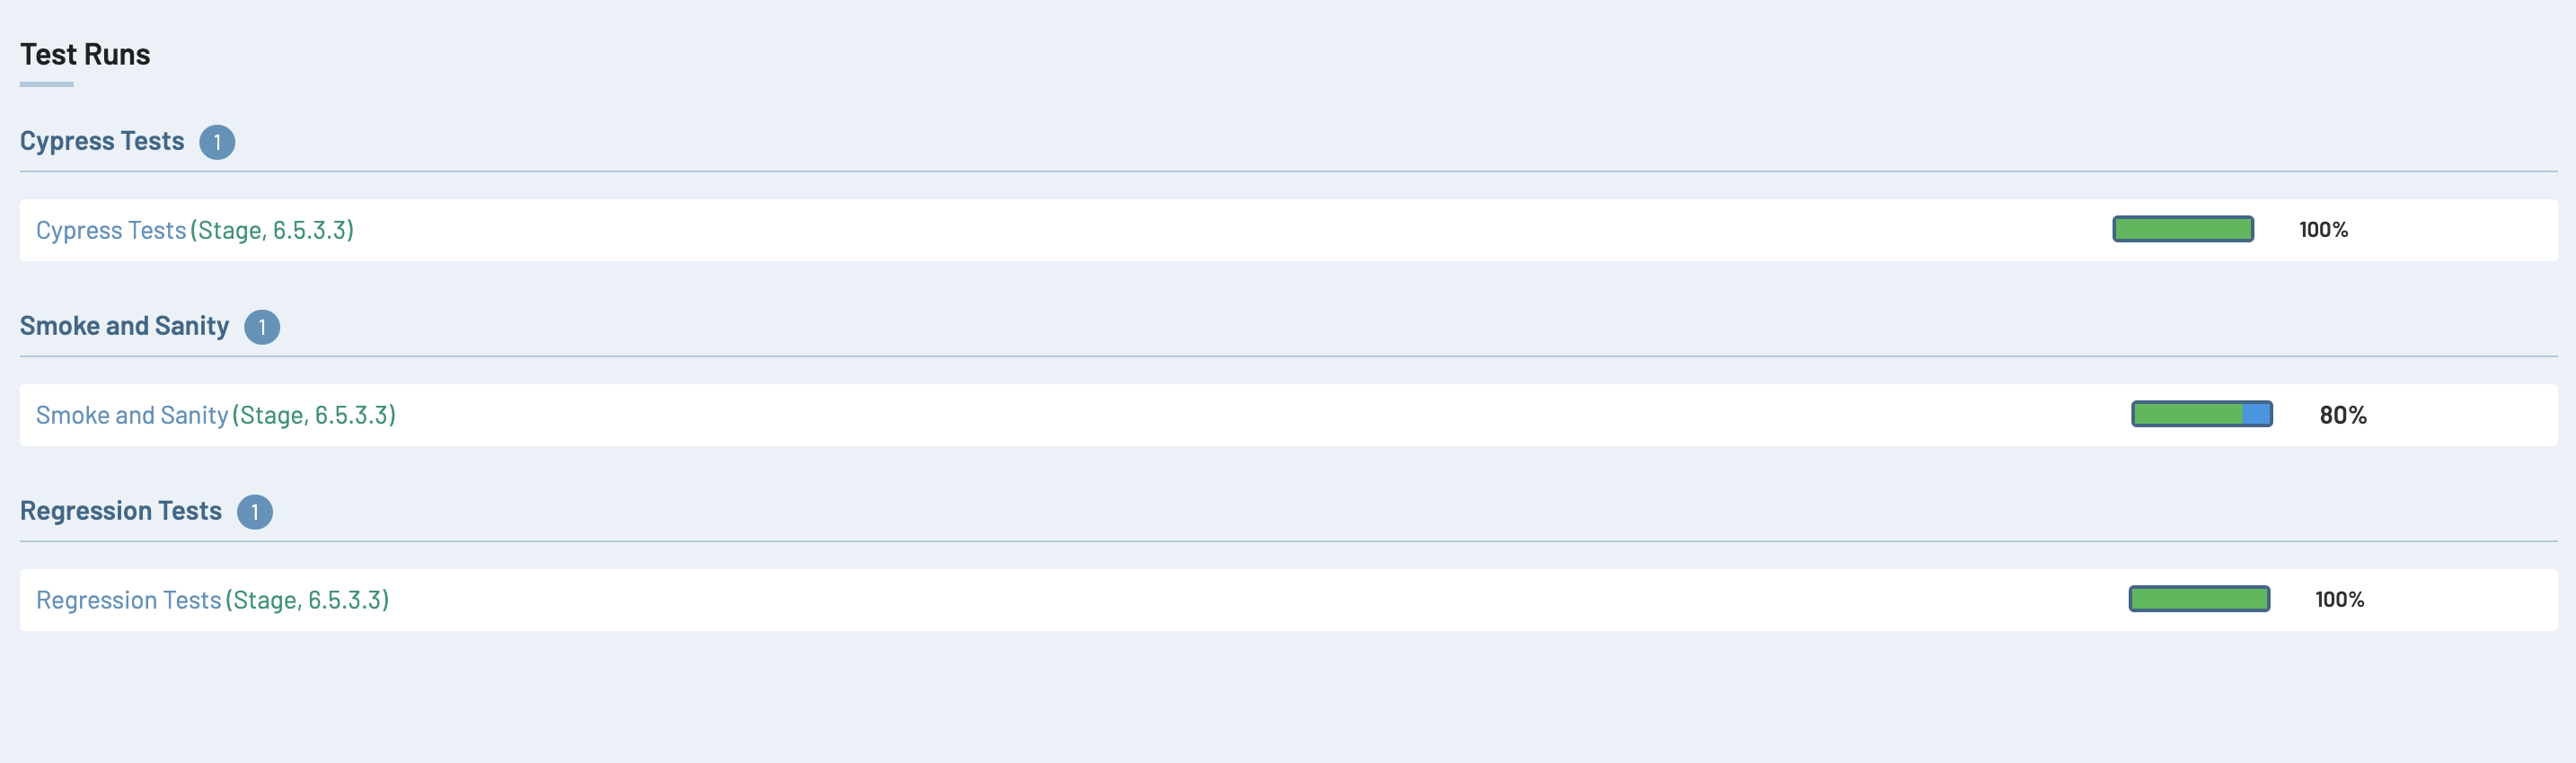
Another variant is that a test plan contains different test runs covering diverse topics. This could mean, for example, that one of the test runs might contain all the automated Cypress tests, another for smoke and sanity tests, and another for regression testing or new features. This is often helpful to have a visual representation, but can also be used to assign to different testers on the team. In this case, the test runs would remain open or repeated until everything is ultimately OK.
Before we actually create a test plan, we should look at the “Milestones” section in the main menu item. All test plans or test runs can also be assigned to milestones. These thus provide a rough subdivision, which can be done at your own discretion or in coordination with the project management.
Now we create our test plan and three test runs each for “Cypress Tests”, “Smoke and Sanity” and “Regression Tests”.
When creating a single test run, we have several options for selecting the tests. We can choose to add all tests, only certain manually selected tests, or use dynamic filtering to make the selection.
In case of manual selection, a window opens with an overview of our test catalog. Here we can navigate through our structured sections and select desired tests by simply ticking them. After clicking “OK”, the selected tests are applied to the test run.

When using dynamic filtering, we also see a modal. On the right side we have the possibility to specify different filter settings. Depending on how extensive the list is, we need to make sure to click on the “Set Selection” button at the bottom (scrolling may be required). Only then will TestRail highlight the appropriate tests based on our filtering. The rest of the process is the same as for manual selection.
If you now think that this is all TestRail offers us, you are considerably mistaken. TestRail offers us many more useful functions in the editing view of a test plan. The “Configurations” button opens a small window where we can create various groups and configurations. Based on the selected combinations, our prepared test cases will be duplicated and created for each specified configuration. For example, we could create groups for browsers, operating systems and devices. The configurations could then be “Chrome”, “Firefox”, or “Windows 11”, “MAC”, etc. We can then select which combinations we want to test. After we confirm this, we have different test runs for all our combinations, which we can customize or even remove. Of course, it is also possible to assign each Test Run to a different tester in the system.
So with all these features, we have flexible options to find our own customized approach for a project and a way of working.
At the end of the day, it is crucial to have a clear overview of the tests and be able to quickly provide feedback on the current status.
Test Execution
Now we finally get to the execution of our tests. Depending on the strategy and approach, this can be done either during the project, or classically at the end. Combinations are also possible if there are sufficient resources.
To start a run, we simply go to the detail page of the desired test run. On this page we have an efficient overview with statistics, sections and filtering options. A simple master-detail navigation allows to see the list of tests on the left side, and the details of the currently selected test on the right side.
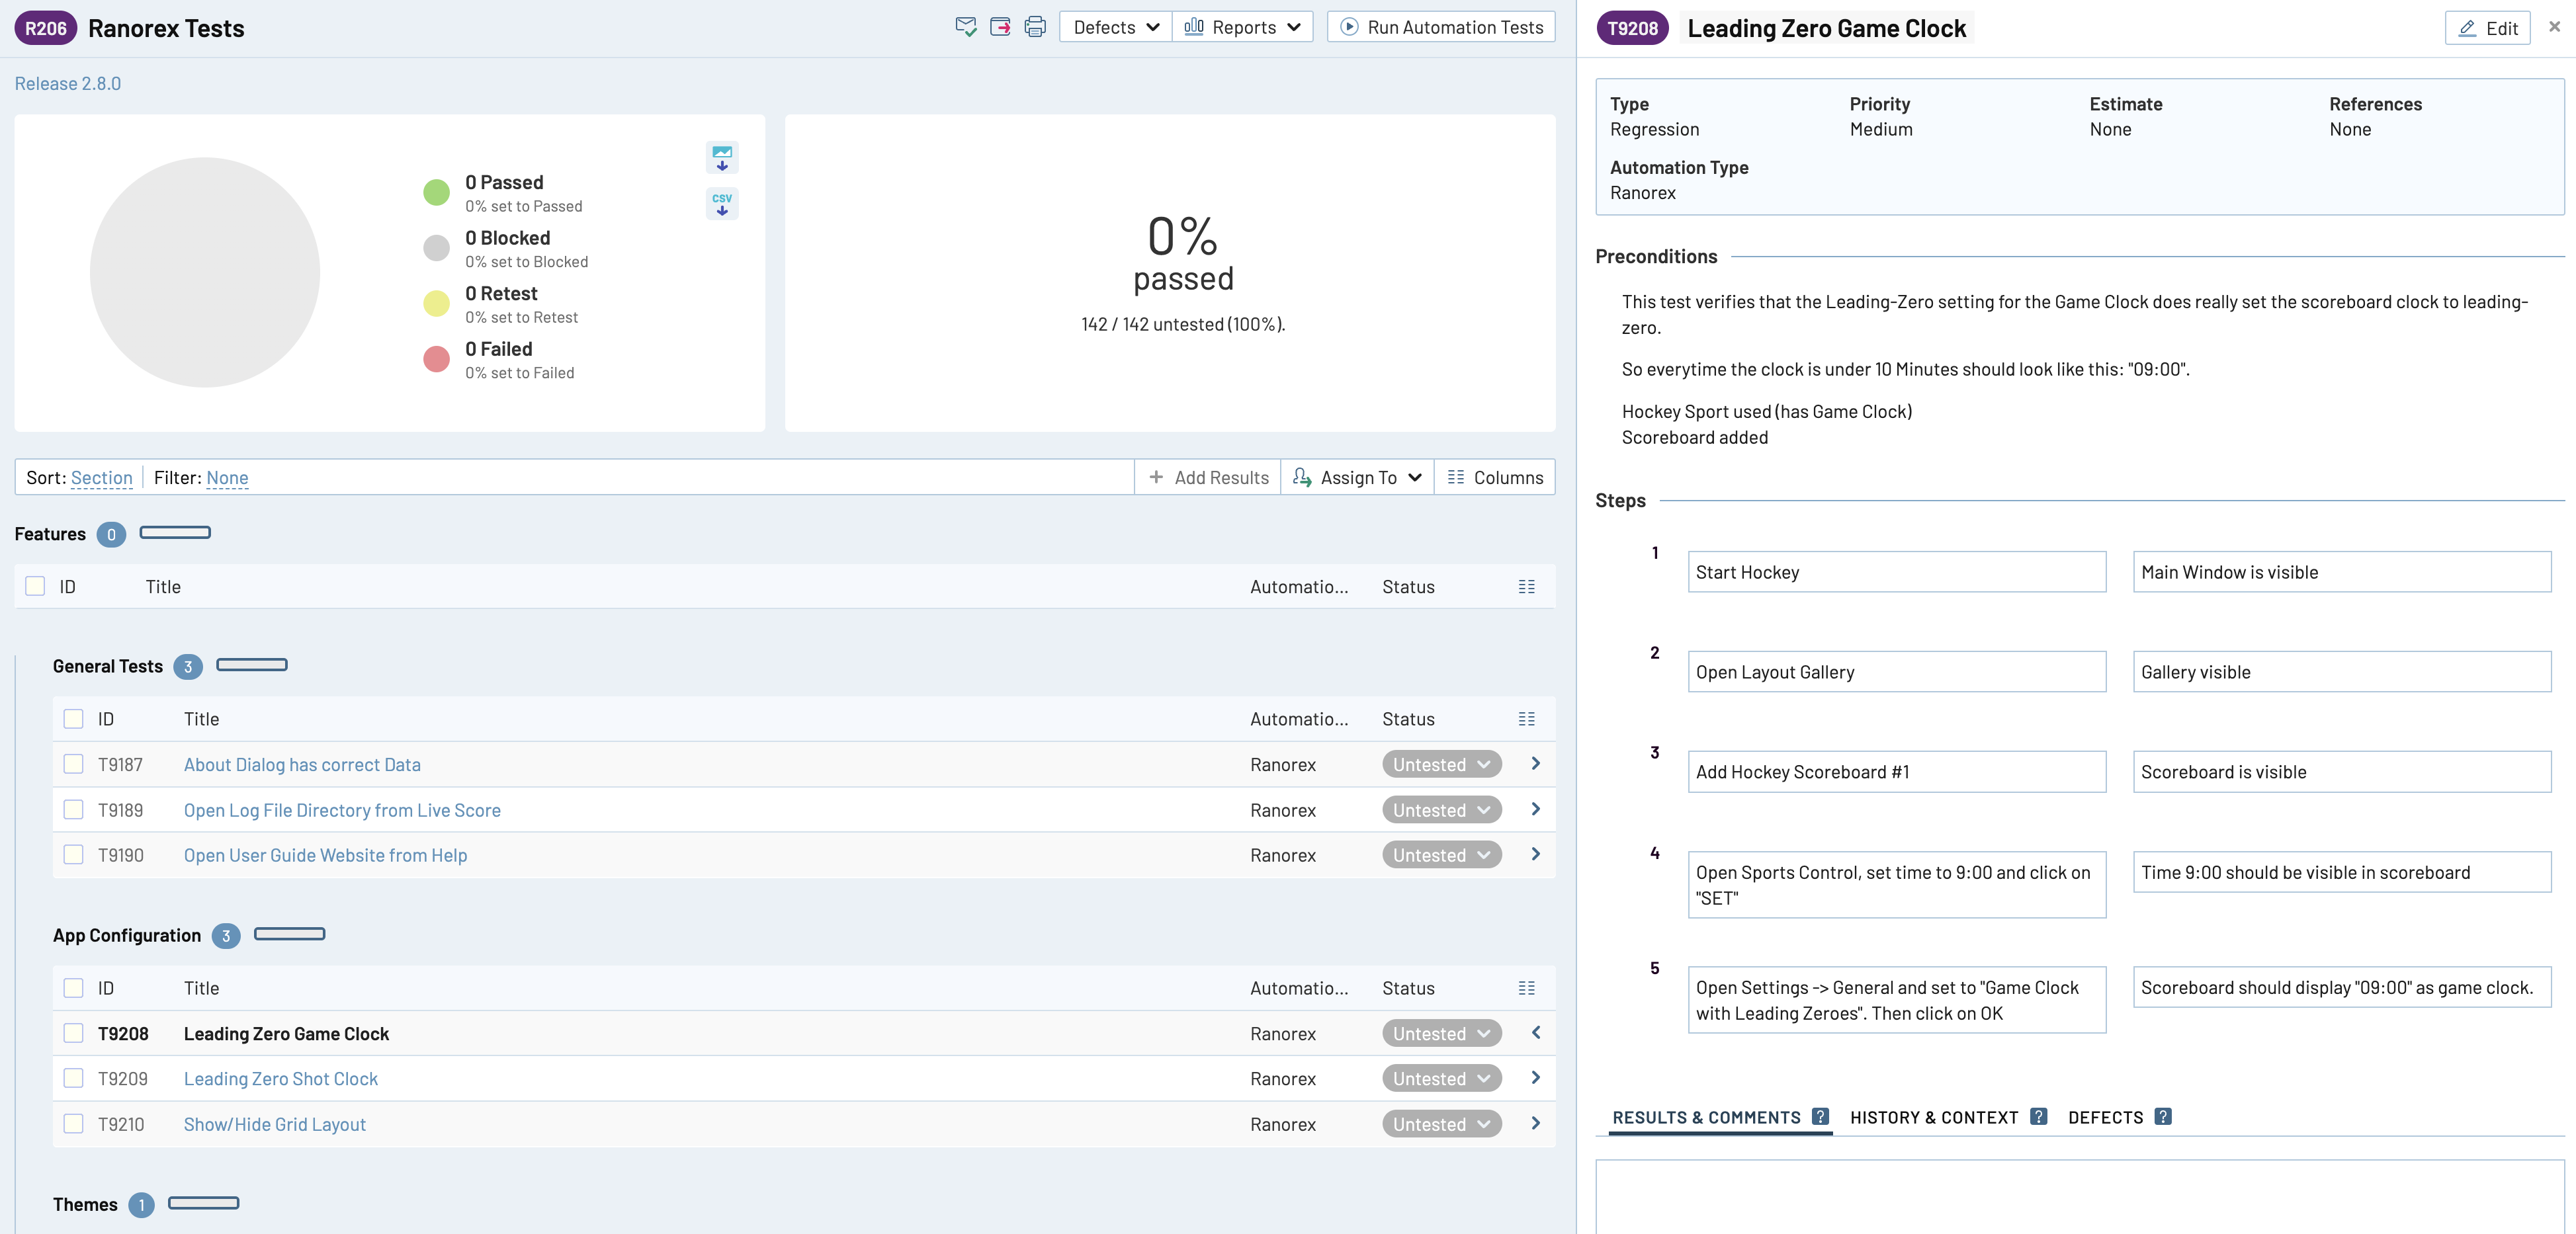
For each test, multiple results can be recorded here. To do this, we simply click on the drop-down menu of the status (e.g. “untested”) in the list or on “Add result” within the details page. We can pre-select anything without consequence, such as “passed”, as a separate window will open anyway where we can adjust the results again. This may seem unexpected at first, but it is easy to learn. Basically, it is up to us which view we want to use to test. The most important thing is to read the steps carefully. However, the modal offers the advantage of marking steps already performed as “passed” to keep track of them, and it also allows us to record times, which can be interesting for planning future test runs.
Once we have captured the result of the test, TestRail does an excellent job of logging. The modal contains not only a comment function, but also fields for build number, version, etc., in addition to the status (Passed, Blocked, Retry, Failed). These can be expanded with additional fields as needed. A particularly interesting area concerns defects. Here we not only have the option to enter reference numbers (i.e. ticket IDs), but you can also create tickets directly in Jira, as long as Jira is connected to TestRail. So if we find a bug in the software, we can create a Jira ticket directly from TestRail, and the ticket ID is automatically linked to the test result in TestRail. This allows QA teams to track the current status of Jira tickets directly in TestRail and see when a feature can be retested, independent of project management and developers. Within Jira, all relevant information from TestRail is displayed in the ticket, and the template used can be edited in TestRail. In this way, developers are also provided with all the necessary information.
IPC NEWSLETTER
All news about PHP and web development
Traceability and Reports
TestRail provides a comprehensive range of reporting options to monitor progress and test coverage. You can compare results from different test runs, configurations and milestones. These reports can be automatically generated with a schedule and shared with both internal team members and external stakeholders, including the ability to generate reports as PDFs.
Learning TestRail’s reporting features may take some time, but once the various options are understood, many options are available to customize the reports to meet the team’s unique needs.
In addition to generated reports, TestRail also offers real-time reports. These can be found at the project level, milestone level, test plan level and test run level.

In the area of tracking, TestRail provides the ability to assign external reference IDs. This can be a Jira ticket ID, for example. If one has additionally linked Jira correctly, a tooltip field with information directly from Jira even opens when hovering. This gives you the possibility to assign different tests to a Jira ticket (e.g. Epic). This linking can be used for corresponding evaluations, but also for simple filtering when creating test plans.
TestRail API
TestRail has an extremely comprehensive HTTP-based API, which enables the creation of a wide range of interfaces. Using this API, we can retrieve test cases, create new test results, send attachments, and perform basic tasks such as creating test runs and editing configurations.
TestRail provides its own Github repository with templates for development in PHP, Java, .Net, Ruby and more.
Based on this API, we can now integrate a plugin for our test automation and submit results directly from Cypress to TestRail.
Cypress and TestRail
There are various reasons why test automation is sought. Whether it is due to resource constraints, to avoid repetitive steps, or to secure critical areas of the application that are often error prone.
To begin automation with Cypress, let’s create a Cypress project. Since the focus of this article is on TestRail, we will not go further into the implementation of Cypress tests here. The crucial point is the actual integration of our plugin.
First, we select a test from our test catalog. In collaboration with QA and development team (or Test Automation Engineers), a kick-off is conducted to take a closer look at the desired test and its behavior. After the test is implemented in Cypress, it is reviewed accordingly. If everything fits, we can mark the test as “automated” in TestRail. This will give us a better overview in the future of which tests are automated, and therefore no longer need to be tested manually.
But how do the results from Cypress get into TestRail? Quite simply – via an appropriate plugin based on the TestRail API. We install a compatible plugin like the “Cypress TestRail Integration” [https://github.com/boxblinkracer/cypress-testrail].
The configuration is relatively simple using the “setupNodeEvents” function enabled by Cypress.
e2e: { setupNodeEvents(on, config) { return require('./cypress/plugins/index.js')(on, config) } , }
This file relates our manually created “index.js” file with the actual registration of the plugin. Of course, this step can also be done inline.
const TestRailReporter = require('cypress-testrail');
module.exports = (on, config) => { new TestRailReporter(on, config).register(); return config }
After this is done, there are only two simple steps left. First, we still need a configuration for our TestRail instance, and of course we still need to link our created test to the test that is in TestRail.
Let’s start with the configuration. We have several options to do this. Either we create a “cypress.env.json” file or work directly with environment variables, for example in the CI/CD section.
The plugin offers two basic ways to send results to TestRail. It is possible to send the results directly to an existing and prepared test run, or to have new runs created dynamically. The choice of the appropriate approach can vary depending on the team and the project. So this flexibility is given.
The following example shows a JSON file that sends results to a defined Test Run:
{ "testrail": { "domain": "my-company.testrail.io", "username": "myUser", "password": "myPwd", "runId": "R123" } }
After the connection is configured, we just need to map our Cypress test to the appropriate TestRail test. This is done via a simple mapping in the test description (Test Description) using the ID from TestRail. The TestRail ID is visible with the tests and always starts with a “C”. It is also possible to link multiple Test Cases to a single Cypress Test.
it('C123: My Test for TestRail case 123', () => { // ... // ... })
it('C123 C54 C36: My Test for multiple TestRail case IDs', () => { // ... // ... })
That’s all. Now when we start Cypress in “run” mode, we see a hint about our integration and its configuration at the beginning. After a spec file is processed in Cypress, the results of the tests performed in it are finally sent to TestRail.
The integration offers many more options, such as uploading screenshots, adding more metadata and much more.
Conclusion
Testing is more than just running tests. To get the multitude of necessary tasks sorted out, test management tools like “TestRail” help us. TestRail offers a powerful test management solution that covers the entire quality management process, from test case creation to reporting. With features for structuring test catalogs, flexible test plans and comprehensive reporting, it enables efficient test management.
IPC NEWSLETTER
All news about PHP and web development
TestRail’s seamless integration with other tools, such as Jira, facilitates collaboration between test and development teams. In addition, the fully comprehensive API enables integration for automation software such as Cypress and Co. among others.
Overall, TestRail provides a comprehensive solution to streamline the QA process and deliver high-quality software products.