As a client, you determine which data is needed. The flood of data is in your hands. In this article, we will experience this directly in the GraphQL Playground. With this tool, you can easily create and test your own queries. Thanks to tools like the GraphQL Code Generator, using it in frontend frameworks like Vue.js is practically magic since commands for API communication be automatically generated. We will create a small blog as an example project. Basic knowledge of PHP, Composer, and Laravel are assumed.
Installation
Let’s start by launching a simple Laravel project. This process can vary depending on your operating system, so please refer to the official documentation [1]. In the next step, we add the framework Lighthouse using Composer. When using Laravel Sail this should happen in the shell (sail up -d && sail shell). You can see the procedure using Composer in the following:
composer require nuwave/lighthouse
php artisan vendor:publish --tag=lighthouse-schema
IPC NEWSLETTER
All news about PHP and web development
The second command generates a schema in the graphql directory. This describes the interface of GraphQL and at first, it contains two queries to read data from the model User. We will edit this file later. Next, install the GraphQL Playground. This is the best way to test the GraphQL interface:
composer require mll-lab/laravel-graphql-playground
This must also be set up, since we store the data in the MySQL database.
In the beginning, there is the data structure
For this example project, we’ll use a data structure that’s as simple as possible. We will use the following models:
- Blog will contain a blog entry.
- Author will represent a blog author.
We create the Model files and the Migration files, keeping them simple. We create, or rather prepare, the Author first since we will want to refer to it in the blog. In our case, a blog has a single author:
php artisan make:model Author -mf
php artisan make:model Blog -mf
Only a few columns in our migration files are required for the necessary tables, which you can see in Listings 1 and 2.
database/migrations/...create_authors_table.php
public function up()
{
  Schema::create('authors', function (Blueprint $table) {
    // The author only has one name,
    // an ID, creation and update date
    $table->id();
    $table->timestamps();
    $table->string('name');
  });
}
database/migrations/…create_blogs_table.php
public function up()
{
  Schema::create('blogs', function (Blueprint $table) {
    // The blog has a title, content, and author
    // an ID, creation and update date
    $table->id();
    $table->timestamps();
    $table->string('title');
    $table->mediumText('content');
    $table->foreignIdFor(\App\Models\Author::class);
  });
}
With php artisan migrate we can write the changes into the MySQL database. Now we have a relationship between Author and blog in the model (Listing 3), with something important for Lighthouse to take note of: The return type must be specified in the relationship function, or else Lighthouse cannot automatically recognize relationships (Listing 4).
app/Models/Author.php
namespace App;

use Illuminate\Database\Eloquent\Model;
use Illuminate\Database\Eloquent\Relations\HasMany;

class Author extends Model
{
  public $fillable = ['name'];

  public function blog() : HasMany{
    return $this->hasMany(Blog::class);
  }
}
app/Models/Blog.php
namespace App;

use Illuminate\Database\Eloquent\Model;
use Illuminate\Database\Eloquent\Relations\BelongsTo;

class Blog extends Model
{
  public $fillable = ['title','content'];

  public function author() : BelongsTo{
    return $this->belongsTo(Author::class);
  }
}
This will give us a simple data structure we can experiment with. Optionally, we could create factory and seed classes to fill the tables with fake data. However, since we want to insert new entries into the tables with GraphQL later, we don’t need this right now.
First steps with the GraphQL interface
After defining our basic data structure, let’s open the GraphQL Playground at the URL http://localhost/graphql-playground. In the beginning, queries for users already exist in our schema, so let’s test if the playground works. After opening it, let’s write an opening curly bracket in the left field. This is shorthand for query QUERYNAME {} and means “I want to execute a query” Within this mode, pressing CTRL + SPACEBAR will open autocomplete. It should already show suggestions for all permitted queries (Fig. 1).
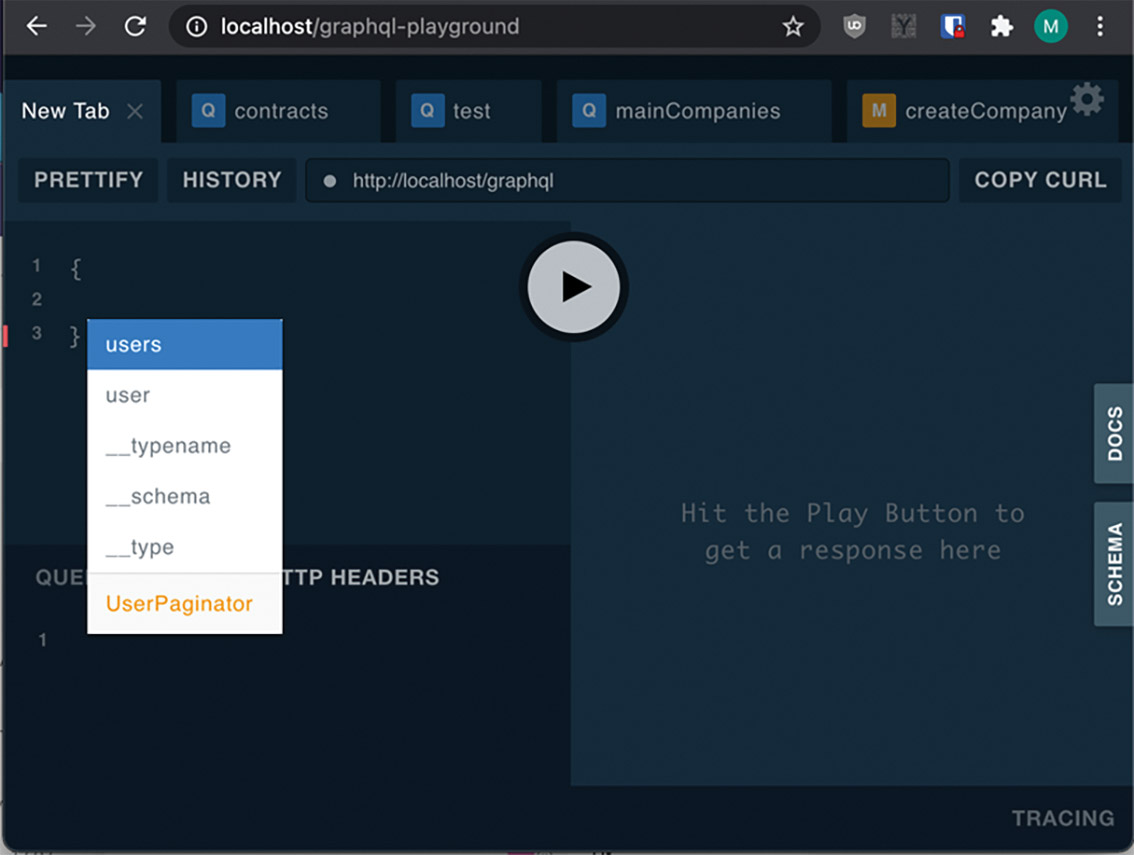
Fig. 1: Suggestions of all permitted queries
As a first query, we receive a list of all users. For this, users must be selected in the auto-completion. Alternatively, this can also be written out manually. Now we have to define which of the possible attributes we want to have back. This is GraphQL’s strength. As users of the API, we can greatly reduce traffic by specifying what we need. To select potential answers, we need to write a curly bracket again and activate autocompletion by pressing CTRL + SPACEBAR. Or, we can click on Docs in the right margin to see what’s possible there. Bit by bit, we build up our query (Listing 5).
query getFirstOfUsers {
  users {
    paginatorInfo{
      total
      currentPage
      lastPage
    }
    data {
      id
      email
    }
  }
}
users is not rendered completely by the @pagination directive, but with a scrolling function.
Therefore, in the type paginatorInfo you can get back the current page and the total number of entries. The return value is moved to data.
Hello World
We will now rewrite the schema and adapt it to our needs. Data writing is done by mutations; data query is done by queries. Open the file /graphql/schema.graphql and first, define a query that executes PHP code we wrote ourselves and returns its value as a response. In the schema, we enter it as:
type Query {
  hello(name: String): String!
}
This adds the query hello, guaranteeing that the response is always a string. The call sign marks the answer as “not null”. So, there will always be a string, and null will never be an answer. Additionally, we define the argument name. This is optional, as string has no callsign. Now, a string can be given to the name field when querying. But first, we create the response class /app/GraphQL/Queries/Hello.php using the shell. Now a basic framework has been created.
php artisan lighthouse:query Hello
In this basic framework, we can write PHP code that has an ending Return value corresponding to the specified type of queries. The transferred parameters are checked or in a checked state in the second argument’s array. The first argument contains data about the parent element, which in our case, is empty (Listing 6).
namespace App\GraphQL\Queries;

class Hello
{
  public function __invoke($_, array $args)
  {
    // Return the name or ‘World is the name is
    // not set
    return ($args['name'] ?? 'World') . '! ';
  }
}
Now, we can test this query in the Playground. We will still submit the name argument:
{
  hello(name: "Tim")
}
The answer we receive is:
{
  "data": {
    "hello": "Tim!"
  }
}
Providing models with GraphQL
Now we want to work with our own data model. For this, we’ll provide a list of all authors and blogs, as seen in Listing 7.
type Query {
  hello(name: String) :String!
    authors: [Author!]! @all
    blogs: [Blog!]! @all
}

type Blog {
  id: ID!
  title: String!
  content: String!
  author: Author!
  created_at: DateTime!
  updated_at: DateTime!
}

type Author {
  id: ID!
  name: String!
  created_at: DateTime!
  updated_at: DateTime!
  blogs: [Blog!]!
}
The square brackets stand for “an array of”. So, we want to create a list of authors and blogs, where no entry is null and at least one empty list is returned (Remember: the call sign stands for “not null”). Authors and blogs are defined with an additional one type each. This also lets us describe their relationship with each other. Lighthouse provides various directives that can change the function of the query or determine how the result is generated. These directives can be understood as markers that all start with an @ symbol. Here, we use @all to automatically populate the types with their associated models. Lighthouse will then try to infer the associated Model class based on the return value’s name. Here, the types are named Author and Blog. So, just as with the Model classes, this means that no additional info is needed. We can test our scheme directly in the Playground after saving it and, if necessary, fix any bugs.
IPC NEWSLETTER
All news about PHP and web development
Modify Models with mutations
Finally, let’s add the ability to add a new entry for a model using GraphQL:
type Mutation {
  createAuthor(name: String!): Author! @create
}
This happens automatically with the directive @create. The return value determines the model that will be created. All arguments are submitted to the model directly before saving. There are similar directives for update, delete, and upsert. Lighthouse also provides directives for validation and the documentation gives many examples of this. If the number of arguments becomes very large, it’s possible to collect them all in a separate type. Then, the directive @spread distributes the inner type as separate arguments to the function. We will exploit this in a moment.
type Mutation {
  createAuthor(input: CreateAuthorInput! @spread): Author! @create
}

input CreateAuthorInput {
  name: String!
}
We can execute the following query to test creating an author:
mutation {
  createAuthor(input: {
      name: "Tim"
  }) {
    id
    name
  }
}
In addition to this method, the return values are also defined at the end. In this case, we want to get back the ID and name. Lighthouse also gives us the possibility to create nested models at the same time. This allows us to save queries later on for more complex structures. This is achieved with a special syntax that varies depending on the relationship. The Lighthouse documentation explains this in detail [2]. As a final example, let’s generate a blog post like this and a matching author for it. First, we add to our schema, as seen in Listing 8.
type Mutation {
  createAuthor(input: CreateAuthorInput! @spread): Author! @create
  createBlog(input: CreateBlogInput! @spread): Blog! @create
}

input CreateBlogInput {
  title: String!
  content: String!
  author: CreateAuthorBelongsTo
}

input CreateAuthorBelongsTo {
  connect: ID
  create: CreateAuthorInput
}

input CreateAuthorInput {
  name: String!
}
Then, we test the mutation in the Playground again (Listing 9).
mutation {
  createBlog(input: {
    title: "Our Title"
    content: "Our first entry with GraphQL"
    author: {
      create: {
        name: "Tim"
      }
    }
  }) {
    id
    title
    content
    author {
      id
      name
    }
  }
}
If it’s successful, we get back the generated entry, as shown in Listing 10.
{
  "data": {
    "createBlog": {
      "id": "1",
      "title": "Our Title",
      "content": "Our first entry with GraphQL",
      "author": {
        "id": "1",
        "name": "Tim"
      }
    }
  }
}
All blog entries including the author can be returned with the following query:
query blogs {
  blogs {
    id
    title
    content
    author {
      name
    }
  }
}

Working with Lighthouse in the Frontend
In the following, we will use GraphQL automated in the React frontend. To do so, we must first generate the React framework with the slightly older Laravel UI. For npm, we must install Node.js. This is already the case in the container of Laravel Sail, for example.
composer require laravel/ui
php artisan ui react
npm install && npm run dev
To view our React component, we update our welcome.blade.php as seen in Listing 11.
<!DOCTYPE html>
<html lang="en">
<head>
  <meta charset="utf-8"/>
  <link rel="stylesheet" href="/css/app.css"/>
</head>
<body>
  <div id="example"></div>
  <script src="/js/app.js"></script>
</body>
</html>
After updating the file with npm run watch, we can view the sample component by calling http://localhost. With Apollo, we access our data on the client side:
npm i @apollo/client graphql
Now, we can use Example.js to write our code. First, we need to initialize Apollo and build a basic framework for our application. We want to address the Hello query and directly display the server’s response (Listing 12).
import React, { useState } from 'react'
import ReactDOM from 'react-dom';
import { ApolloProvider, ApolloClient, InMemoryCache } from '@apollo/client';

const client = new ApolloClient({
  uri: 'http://localhost/graphql',
  cache: new InMemoryCache()
});

function Example() {
  const [name, setName] = useState("");
  let answer = 'No answer from the server'
  return (
    <div className="container">
      <input
        type="text"
        value={name}
        placeholder="Name"
        onChange={e => setName(e.target.value)}
      />
      <div>
        { answer }
      </div>
    </div>
  );
}

export default Example;

if (document.getElementById('example')) {
  ReactDOM.render(
    <ApolloProvider client={client}>
      <Example />
    </ApolloProvider>, document.getElementById('example'));
}
With npm run watch, we compile the code and afterwards, we call the page in the browser. Now we can add our query, which we will specify and test in the playground. Here, we define expected arguments, in this instance: name as “to hand over”.
query hello($name: String) {
  hello(name: $name)
}
Initially, this seems a bit awkward. But errors are clearer if the query is named (in this instance, the first hello is the name) and arguments (in this case, $name) can be used multiple times in a query. In the application, we use the hook useQuery from Apollo. The advantage is that it returns the load status and potential errors directly, as shown in Listing 13.
import { ApolloProvider, ApolloClient, InMemoryCache, useQuery, gql } from '@apollo/client'

// ...

function Example() {
  const [name, setName] = useState("");
  const { loading, error, data } = useQuery(gql`
    query hello($name: String) {
      hello(name: $name)
    }
  `,{
    variables: {
      name
    }
  });


  return (
    <div className="container">
      {error}
      <input
        type="text"
        value={name}
        placeholder="Name"
        onChange={e => setName(e.target.value)}
      />
      <div>
        {loading && 'Think about...'}
        {data && (data?.hello ?? 'No answer from server') }
      </div>
    </div>
  );
}
The result of the server query is in data, where we want to deliver the contents of hello (the inner hello). With useQuery, the query is automatically fired off when it’s called for the first time or when the variables change. Besides useQuery, there is also useLazyQuery, where fetching data has to be manually triggered. For mutations, there is useMutation, which is similar in functionality as the previous two. As the name suggests, it handles mutations. There is even the possibility of uploading files.
Conclusion
Lighthouse PHP is very good for using GraphQL with Laravel. It saves a lot of work, especially in the PHP code since you do not have to write router, controller, and co. for every query.
Links & Literature
[1] https://laravel.com/docs/8.x/installation
[2] https://lighthouse-php.com/master/eloquent/nested-mutations.html